23 Easy Star Nail Designs DIY to Sparkle This Season
 By VelvetNesty
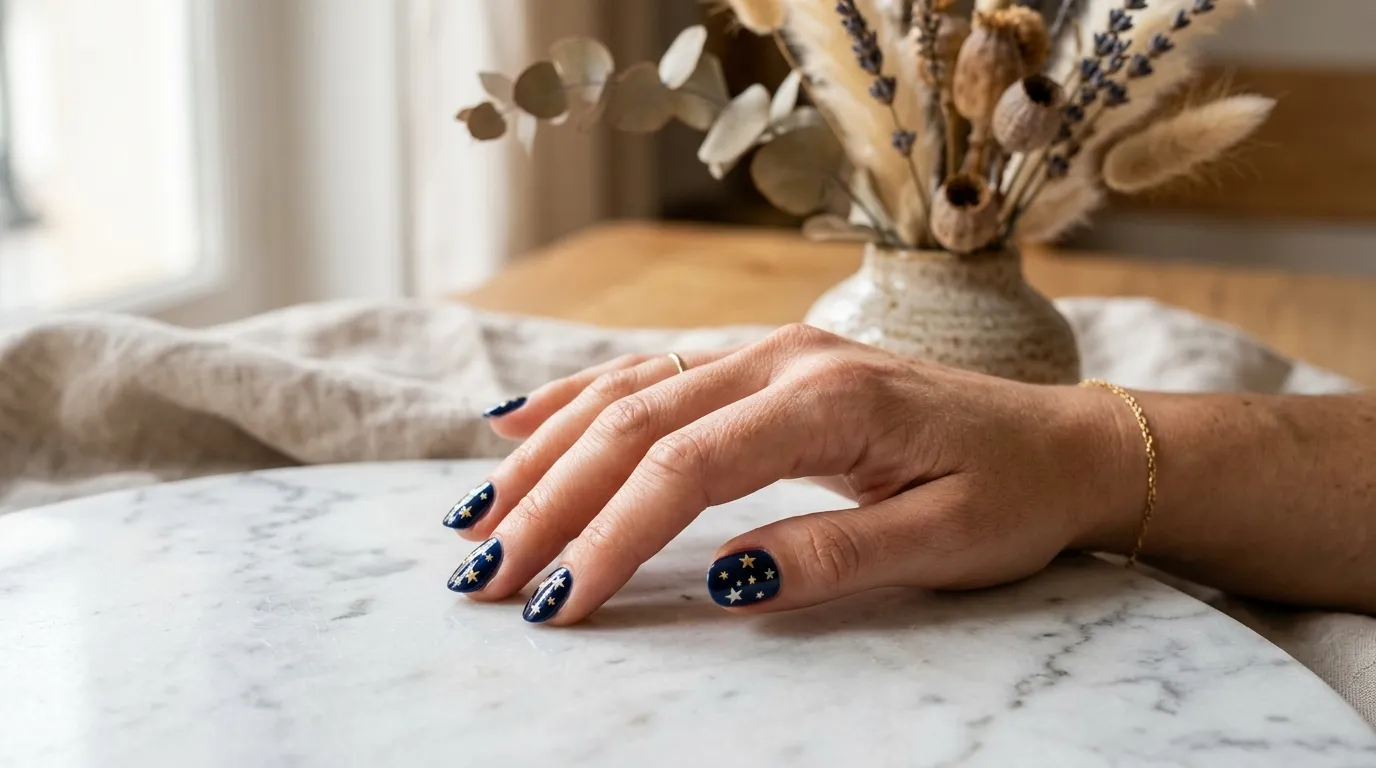
Star nails are having a major moment right now — and the best part? You don’t need a salon appointment to pull them off. Whether you’re getting ready for a holiday party, a weekend festival, or just want something fun on your fingertips, star nail designs are playful, eye-catching, and surprisingly simple to do at home. From minimalist accent stars to full-on celestial galaxies, there’s a style here for every skill level and every budget. Grab your favorite polish, a couple of cheap tools, and let’s get your nails sparkling.
1. Simple Gold Star Accent Nail
This is the perfect starting point if you’ve never tried nail art before.
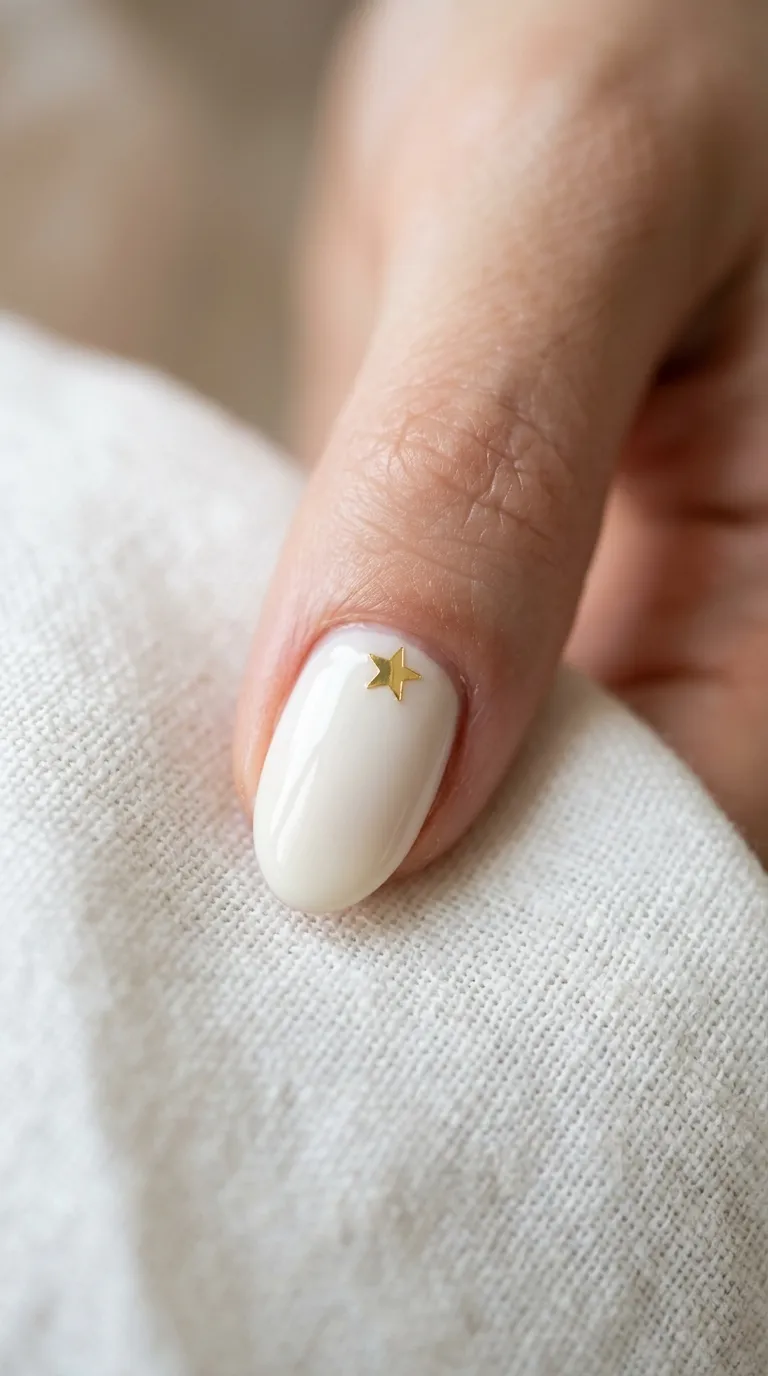
Paint all ten nails in a clean nude or white base coat.
Then pick one nail on each hand — usually the ring finger — and press a tiny gold star sticker right near the cuticle or off to one side.
Star stickers come in packs of hundreds for under two dollars on Amazon or at dollar stores.
You don’t need any special brushes, dotting tools, or steady hands.
Apply a clear top coat over the sticker to seal it flat and prevent peeling.
The whole process takes about fifteen minutes.
This look works for the office, date nights, and casual weekends alike.
If gold isn’t your thing, try rose gold or copper star stickers instead.
Budget tip: Buy a multi-pack of metallic nail stickers. One sheet gives you enough stars for dozens of manicures — that’s pennies per look.
2. Midnight Blue Galaxy With White Stars
Turn your nails into a tiny slice of the night sky.
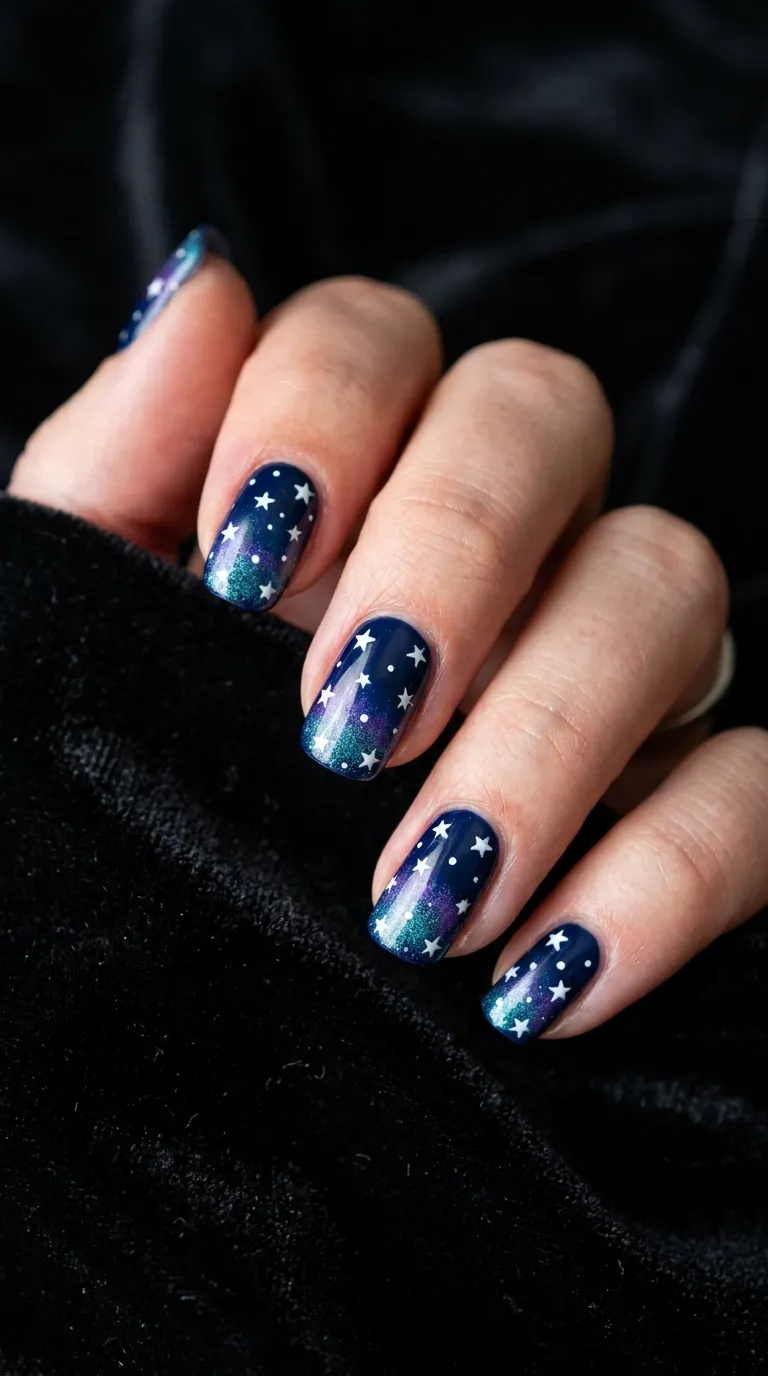
Start with two coats of dark navy or midnight blue polish on every nail.
While the base is still slightly tacky, tear a small piece of makeup sponge.
Dab a tiny bit of purple and teal polish onto the sponge, then lightly press it onto the nail near the tip or center.
This creates that soft galaxy gradient.
Once dry, use a thin nail art brush or a toothpick dipped in white polish to dot small five-pointed stars.
Don’t worry about making them perfect — slightly imperfect stars look more natural and cosmic.
Seal everything with a glossy top coat to make the colors pop.
DIY example: Use polishes you already own. Dark blue, any purple shade, and a basic white will do the job. No need to buy a specialty kit.
This design gets tons of compliments and looks way more complicated than it actually is.
Total cost if you already have dark polish? Under five dollars.
3. Clear Nails With Floating Stars
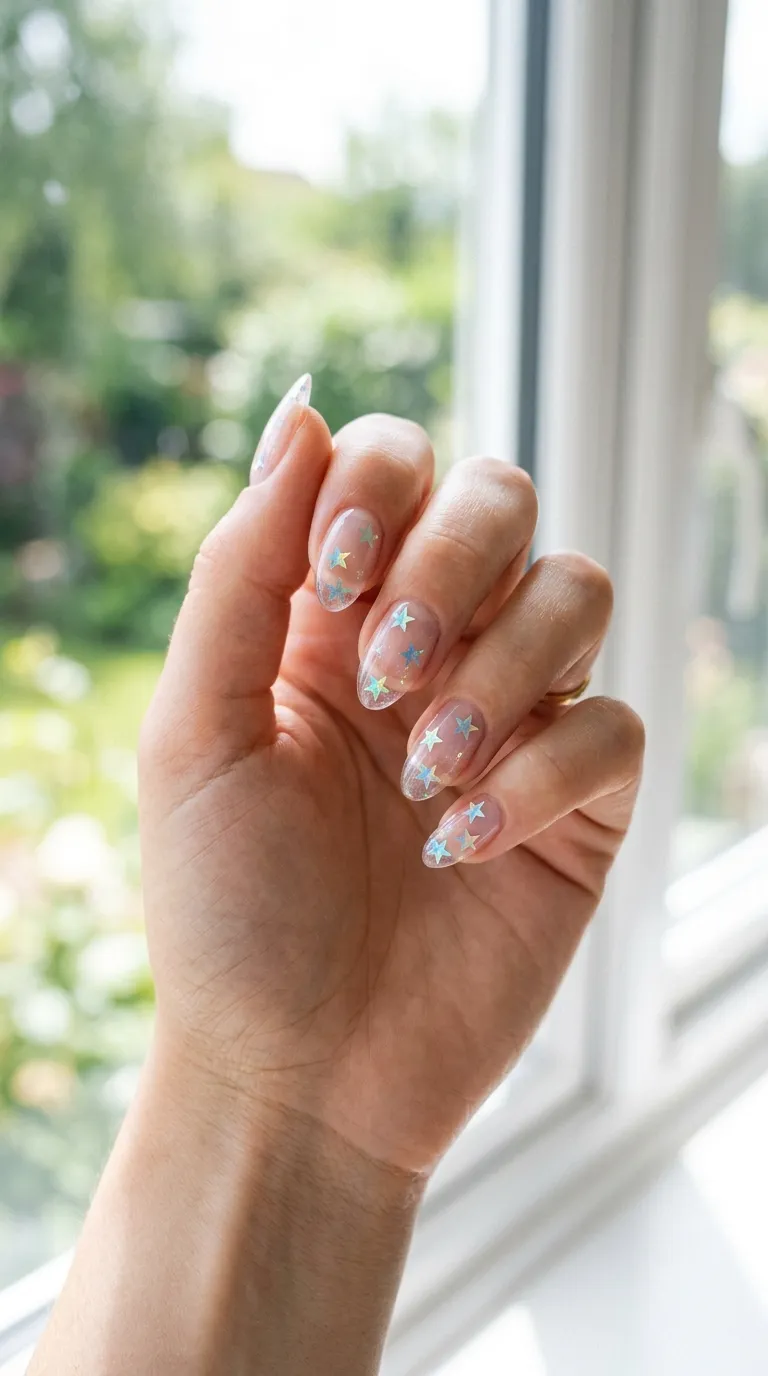
This “jelly” style nail is trending hard on social media — and it’s dead simple.
Apply a clear base coat, then place a few small holographic star glitters on the nail while it’s still wet.
Add another layer of clear polish on top.
Repeat once more if you want the stars to look like they’re floating inside glass.
The trick is layering. Each clear coat sandwiches the stars between layers, creating that 3D suspended effect.
You can find holographic star glitter at any craft store for about a dollar per jar.
A little goes a long way — you only need two or three stars per nail.
Budget tip: Check the scrapbooking aisle at your local craft store. Star-shaped confetti glitter works just as well as fancy nail glitter and costs a fraction of the price.
This design is subtle enough for everyday wear but catches the light in the most satisfying way.
Pair it with short or medium-length nails for the cleanest look.
4. Black Nails With Silver Star Stamps
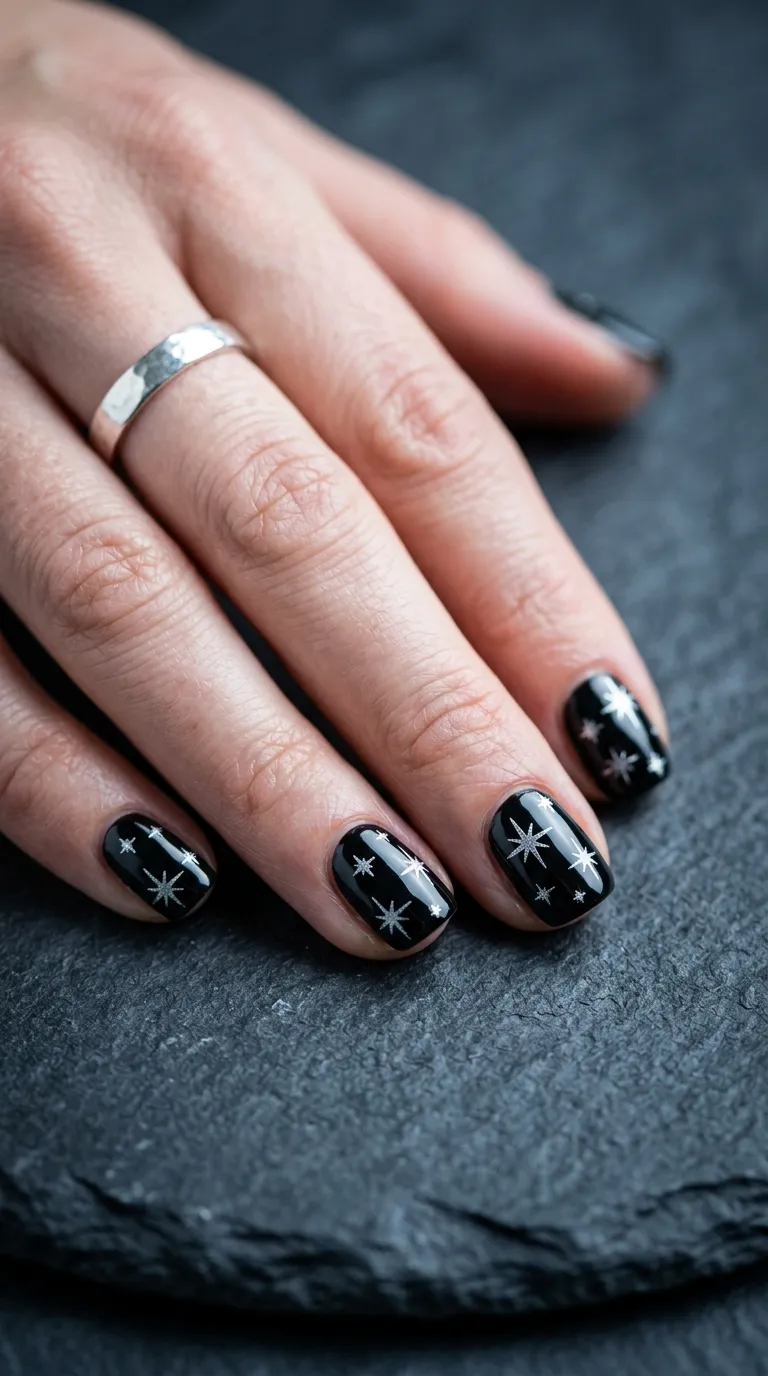
Black nails already make a statement.
Add silver star stamps, and you’ve got an edgy, cool-girl manicure that looks salon-quality.
Nail stamping kits cost between five and ten dollars online and come with metal plates, a stamper, and a scraper.
Choose a plate that has star patterns — most kits include celestial designs.
Paint your nails black and let them dry completely.
Apply silver stamping polish to the star design on the metal plate, scrape off the excess, and roll the stamper over it.
Then press the stamper onto your nail.
It sounds fussy, but after one or two practice nails, you’ll get the hang of it fast.
DIY example: If you don’t want to buy a stamping kit, use a star-shaped hole punch on masking tape as a stencil instead. Tape it on, dab silver polish over the star cutout, and peel the tape away.
Finish with a shiny top coat for a mirror-like finish.
This look is perfect for concerts, nights out, or anytime you want some drama.
5. Pastel Pink With Tiny White Stars
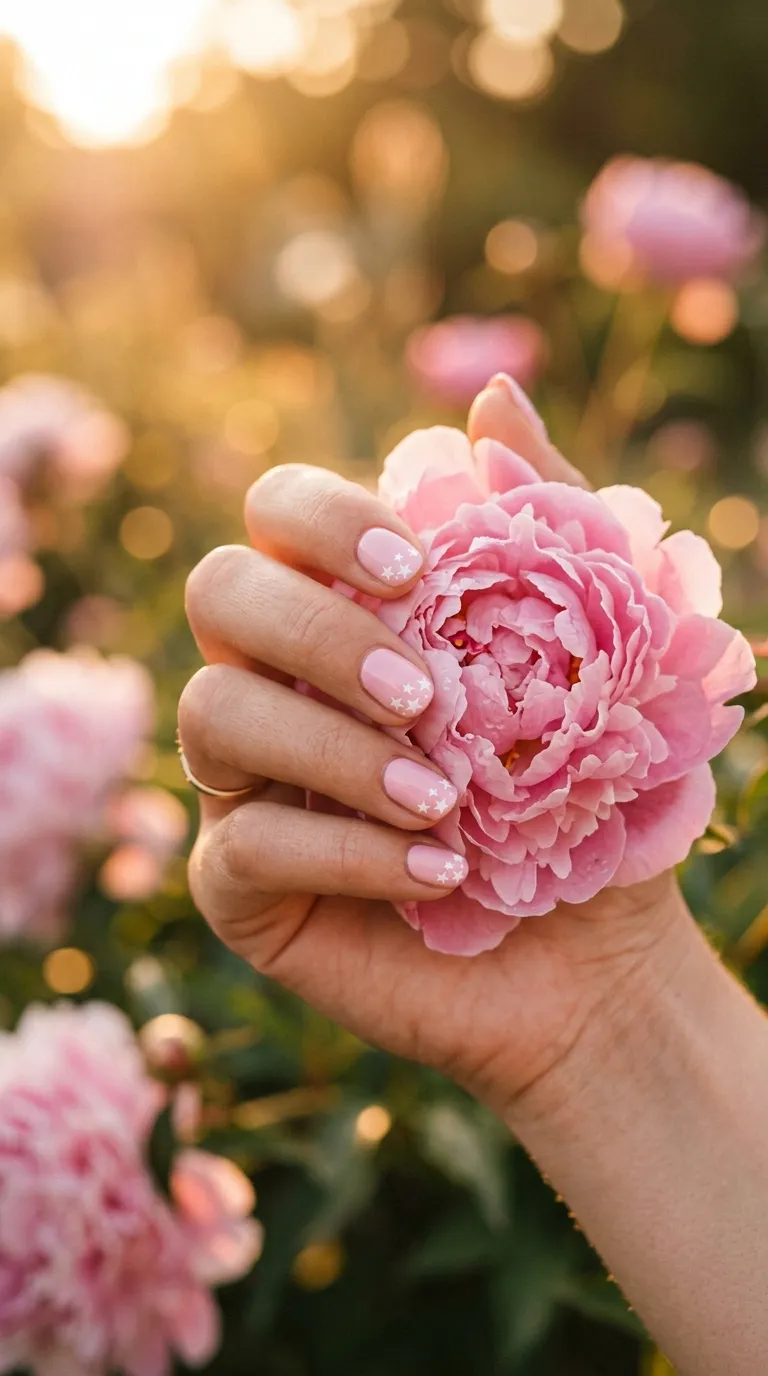
Sweet, soft, and effortlessly pretty — this design screams spring and summer.
Apply two coats of pastel pink as your base.
Once dry, take a thin dotting tool or the end of a bobby pin and dip it into white polish.
Make small star shapes by drawing tiny plus signs and adding diagonal lines through the center.
Place three or four stars scattered near the tips of each nail, leaving some nails with just one star for variety.
This doesn’t have to be symmetrical.
Random star placement actually looks more charming and handmade.
Budget tip: Dollar-store pastel polishes work great for this look. The formula doesn’t need to be perfect since you’re covering it with a top coat anyway.
Add a matte top coat instead of glossy for a completely different vibe — it makes the pink look almost velvety.
This design pairs beautifully with sundresses, linen outfits, and beach days.
It takes about twenty minutes from start to finish and costs practically nothing if you have pink and white polish at home.
6. French Tip With Star Detail
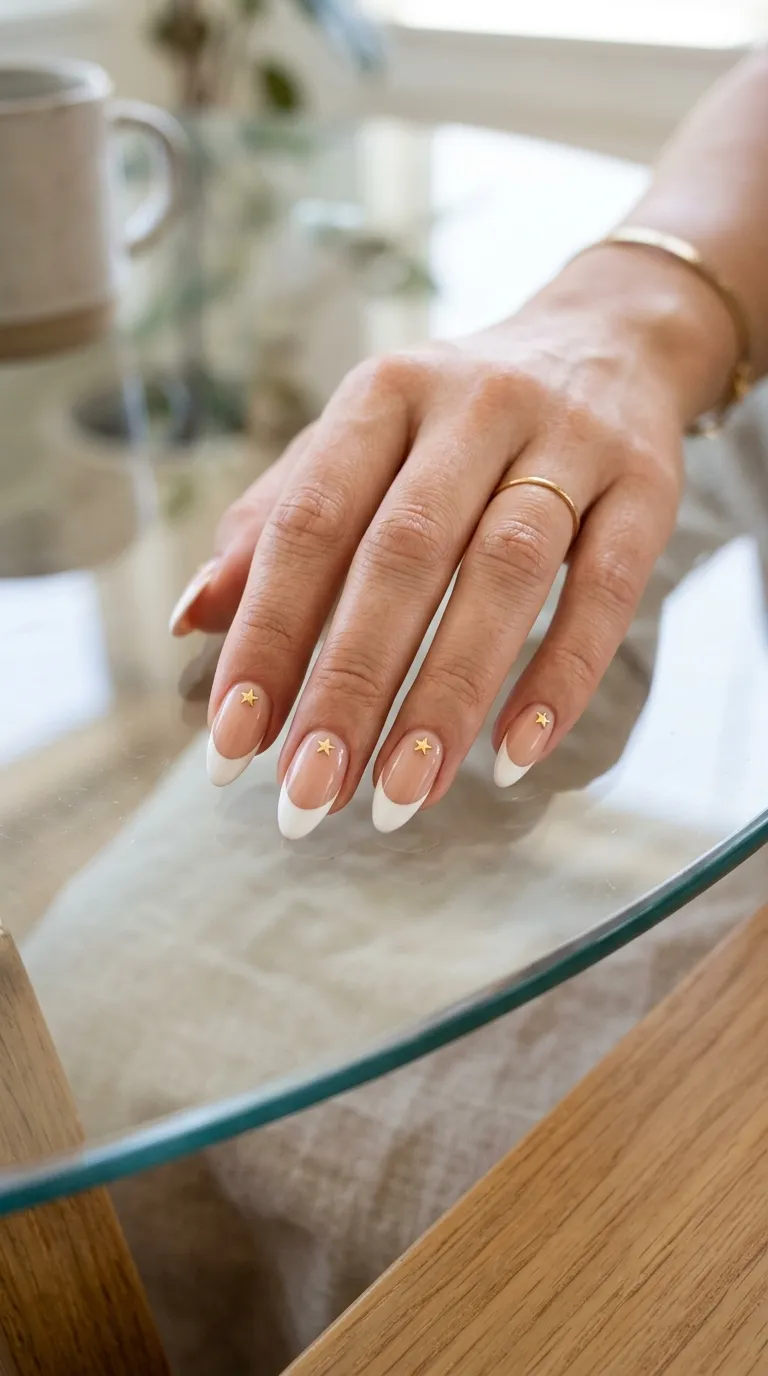
Give the classic French manicure a fun twist.
Paint your regular French tips — white tips on a nude or pale pink base.
Then place a single tiny gold star sticker just below the white line on each nail.
That’s it.
The star sits right at the border between the pink and white, adding a small surprise detail that catches people’s eyes.
If you struggle with painting straight French tips, grab a pack of French tip guide stickers from the drugstore. They’re usually around two dollars and make the white line crisp every time.
DIY example: Use a rubber band stretched across your nail as a guide for the French tip line. Paint above it, let it dry, remove the band, and add your star.
This design is sophisticated enough for weddings, work events, and formal dinners.
It doesn’t scream “nail art” — it whispers it. And that’s exactly what makes it so appealing.
Keep the stars small. Restraint is what makes this look polished and grown-up.
7. Glitter Gradient With Star Toppers
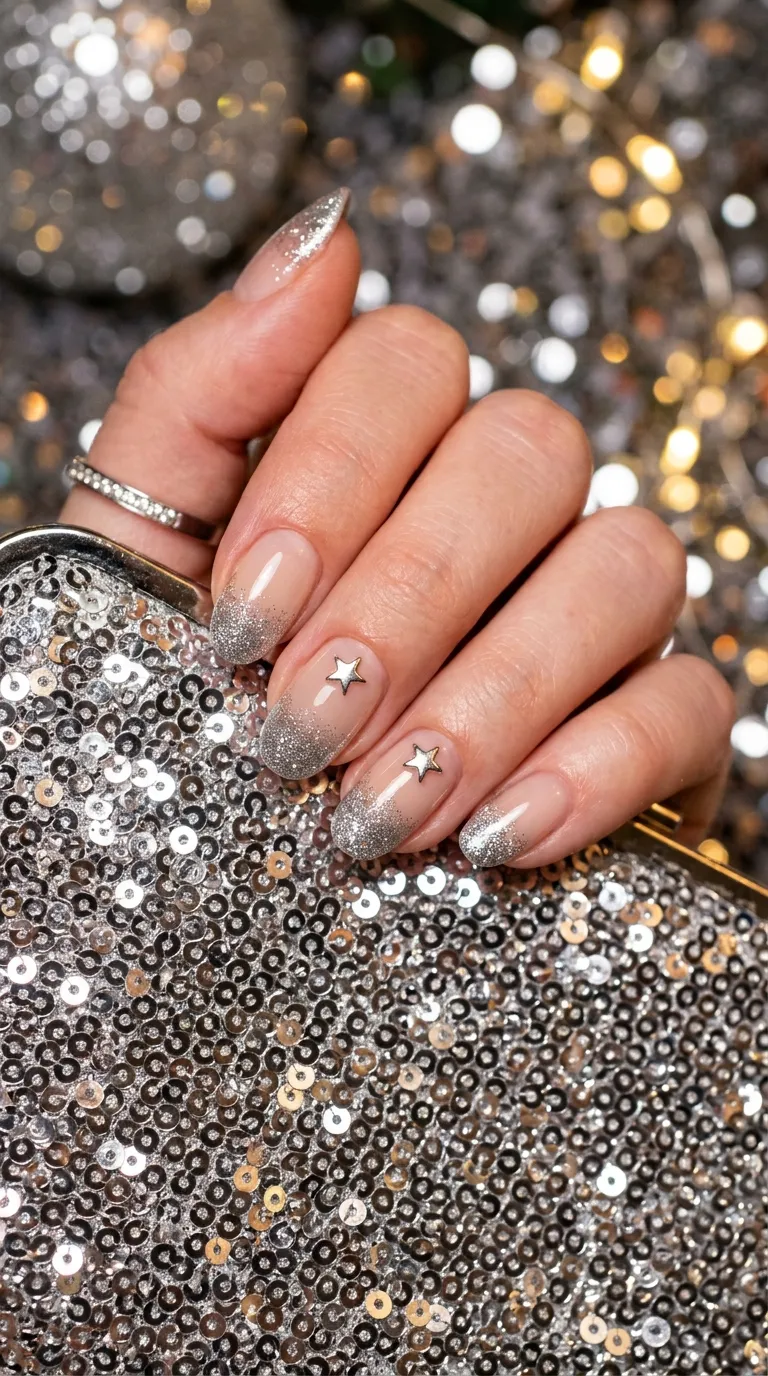
Glitter gradients are one of the easiest nail art techniques around.
Apply a nude base color, let it dry, then use a makeup sponge to dab silver glitter polish onto the tips.
Build the glitter up in layers — heavier at the tip, fading to nothing near the cuticle.
Two or three dabs usually does the trick.
On your accent nails, press a small metallic star charm or 3D star sticker near the base of the nail while the top coat is still wet.
Seal everything with a thick layer of clear top coat to smooth out the glitter texture.
Budget tip: Use loose craft glitter mixed into a clear top coat instead of buying expensive glitter polish. You can customize the amount of sparkle and save money at the same time.
This look is holiday-party-ready but also works for festivals, proms, and New Year’s Eve.
The glitter gradient takes about five extra minutes compared to a regular manicure, and the star charms add that finishing touch.
8. Constellation Nail Art
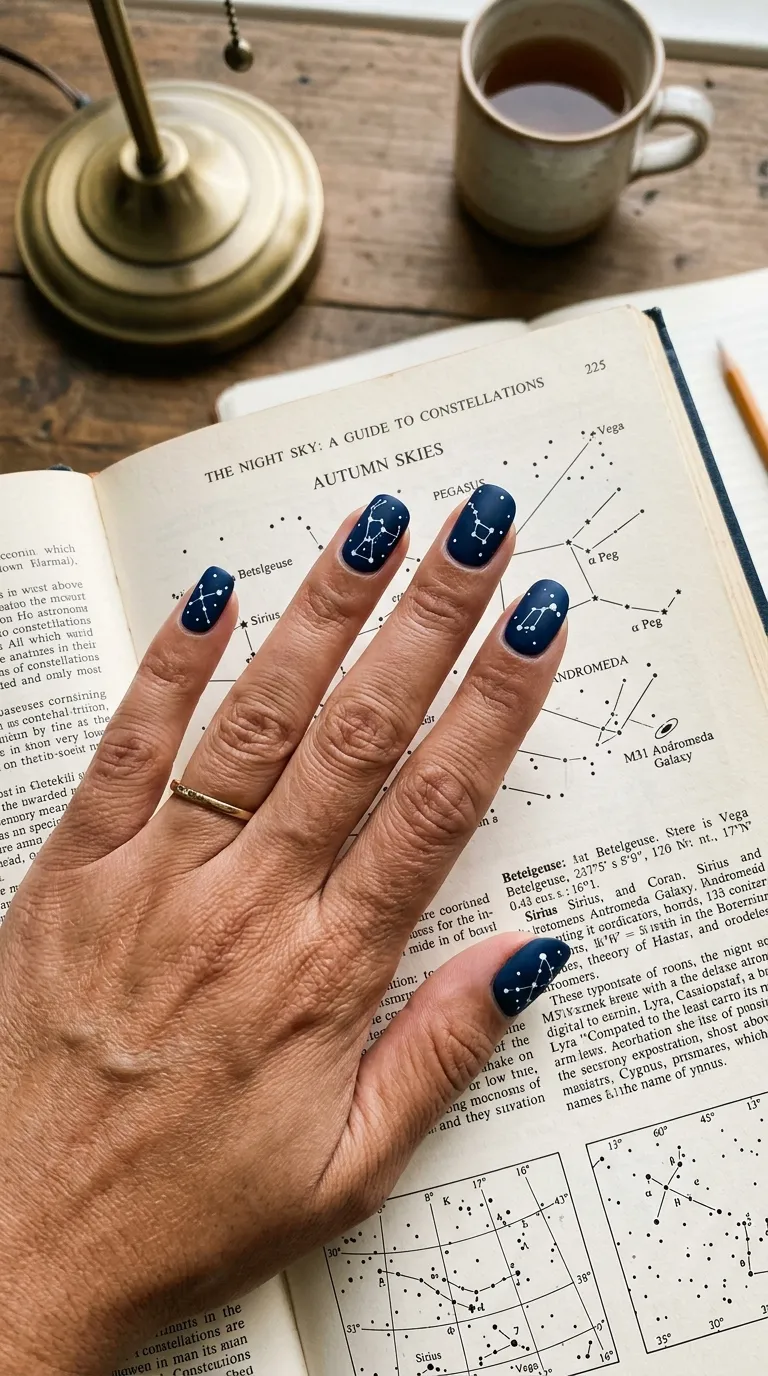
This one’s for the space lovers and astrology fans.
Paint your nails in a matte dark blue or deep charcoal base.
Using a fine-tipped dotting tool or a toothpick, place small white dots in patterns that mimic real constellations — Orion, the Big Dipper, or your zodiac sign.
Then use the thinnest brush you have to draw light lines connecting the dots, just like a star map.
Don’t overthink the accuracy. Even rough constellation shapes look amazing on a dark background.
DIY example: Pull up a constellation chart on your phone and copy the dot pattern. It’s like connect-the-dots on your fingernail.
Make the “main” stars slightly bigger dots and the connecting stars smaller for a realistic effect.
Use a matte top coat to keep the dark background soft and non-reflective — this makes the white stars stand out even more.
Total supplies needed: dark polish, white polish, a toothpick, and a top coat.
Everything you probably already own. Cost? Basically free.
9. Red Nails With Gold Star Confetti
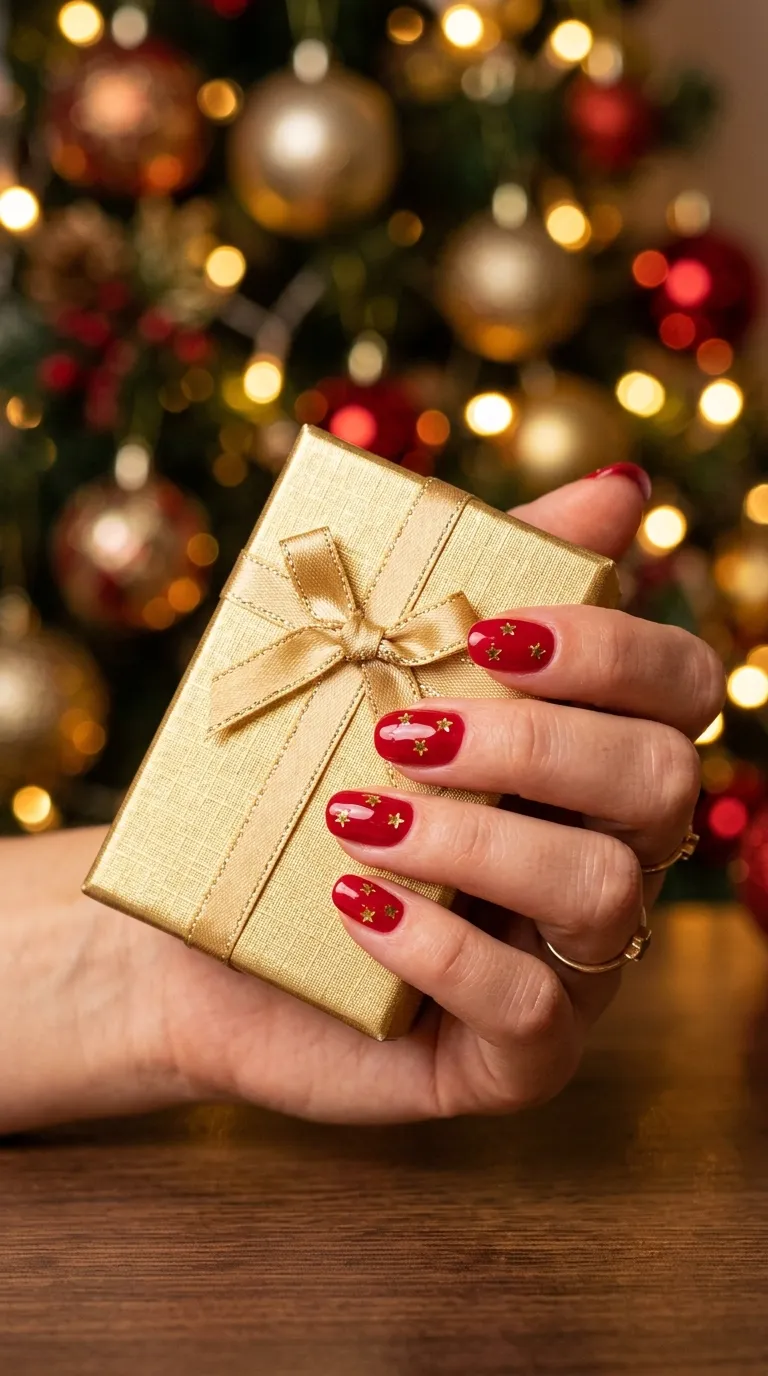
Red and gold is a timeless color combination that screams celebration.
Apply two coats of classic red polish and let them dry until they’re just barely tacky.
Sprinkle or place small gold star confetti onto the wet surface of each nail.
Use a pair of tweezers or an orange stick to position the stars where you want them.
Press them gently into the polish, then seal with two layers of clear top coat to lock everything in place and create a smooth surface.
The gold stars against the red background give off major party vibes.
This is a go-to design for Christmas, Valentine’s Day, Fourth of July, or any celebration.
Budget tip: Grab gold star confetti from the party supply section at the dollar store. A single bag will last you an entire year of manicures and costs about a dollar.
Keep the stars small — about two to three millimeters — so they lay flat and don’t snag on things.
This is a ten-minute design that looks like you spent an hour. Absolute crowd-pleaser.
10. Nude Nails With a Single Statement Star
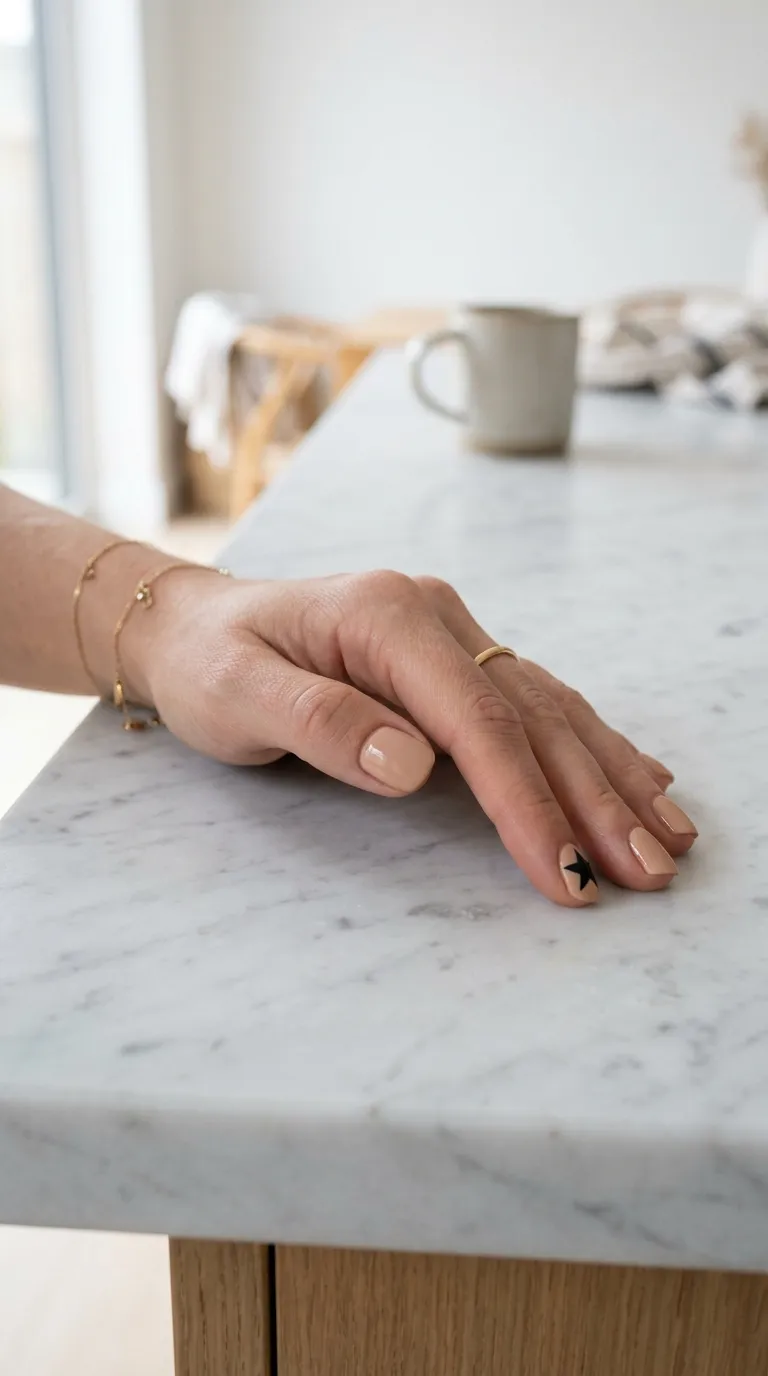
Sometimes less really is more.
Paint all your nails in a warm nude or beige shade that matches your skin tone closely.
On one nail — the ring finger is the classic choice — paint a single bold star in black or dark metallic polish right in the center.
Use a thin nail art brush or a toothpick to draw the star shape.
Start with a plus sign, then add V-shapes between the lines to create the points.
This design takes under ten minutes and looks incredibly intentional and modern.
DIY example: If freehand stars stress you out, cut a star shape from a small piece of tape using nail scissors. Press it on the nail, paint over it, and peel the tape for a clean outline.
The contrast between the quiet nude base and the one bold star is what makes this design stand out.
Finish with a glossy top coat for a polished look, or matte for something more editorial.
This works beautifully on short, natural nails — no acrylics needed.
11. Holographic Star Tips
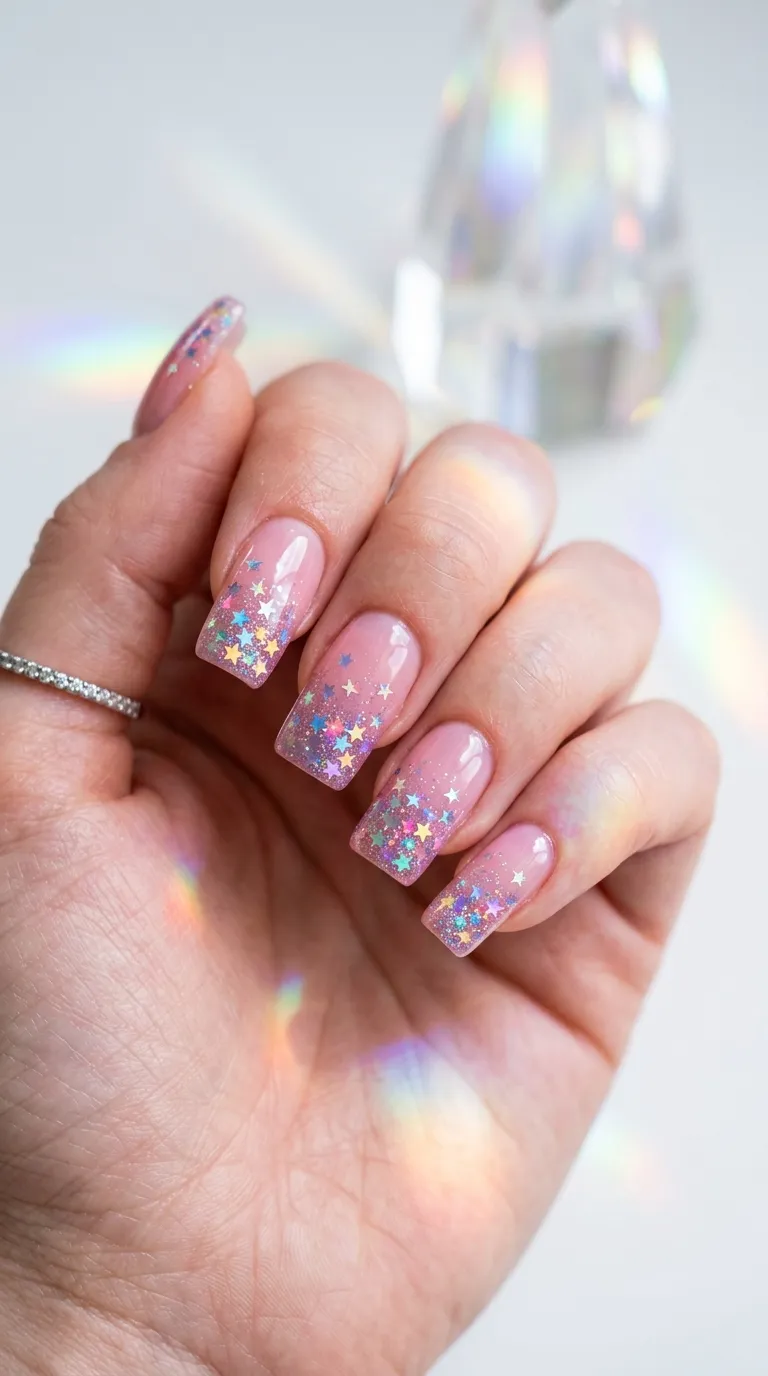
Swap out regular glitter tips for holographic star-shaped glitter and watch the magic happen.
Start with a sheer pink or clear base coat on all nails.
While the base is wet, use a small brush or your fingertip to press holographic star glitters onto the tips of each nail.
Concentrate the stars heavily at the tip and let them thin out as you move toward the center.
The holographic finish means these stars shift colors in different lighting — pink, green, blue, and purple all in one.
Budget tip: Holographic star glitter is available on craft websites for about two dollars a jar. One jar will last months. You can also find it at beauty supply stores in the nail art aisle.
Seal with two coats of a thick, self-leveling top coat like Seche Vite to smooth out the texture and prevent the glitter from catching on hair or fabric.
This look is pure magic in sunlight and under party lights.
It’s fun, flirty, and takes no artistic skill at all — just pressing glitter onto wet polish.
12. Matte Black With Glossy Star Cutouts
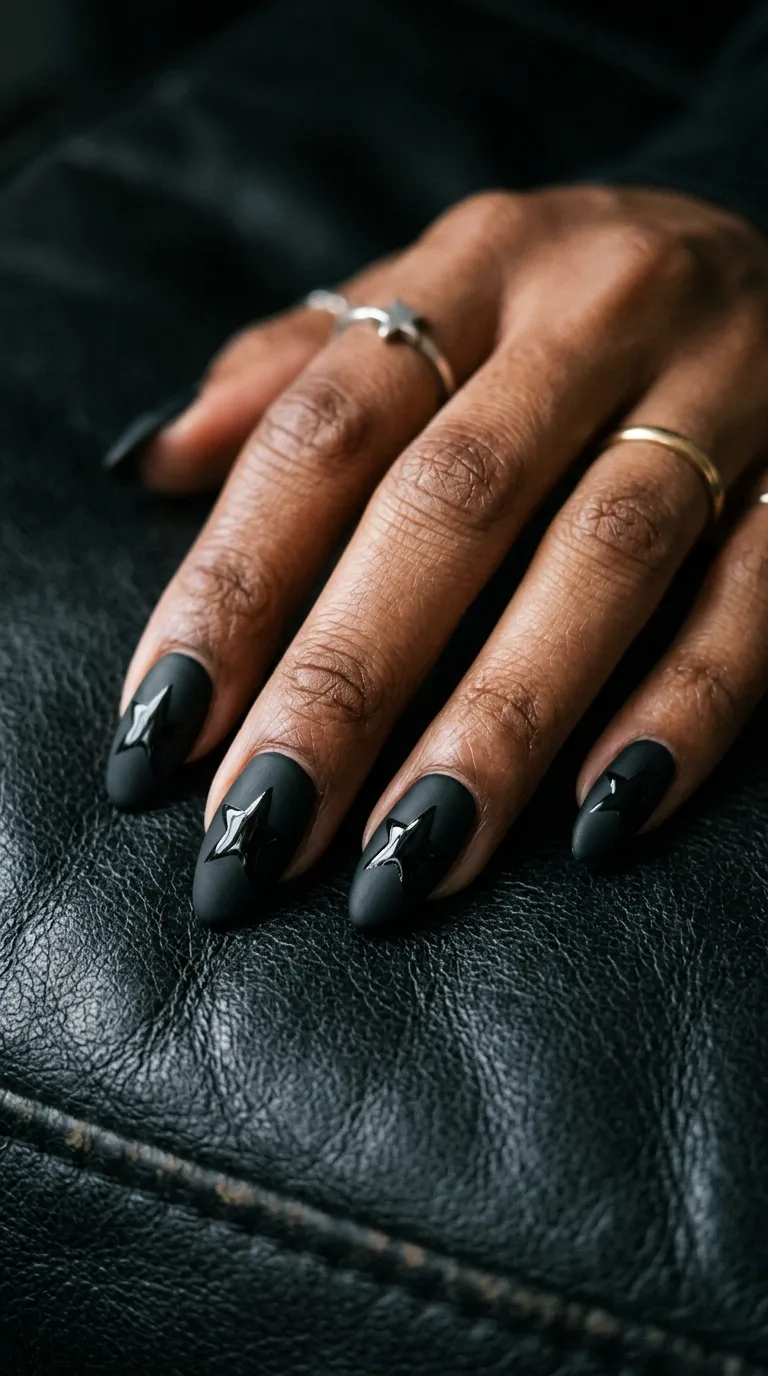
This is a texture-play design that looks super high-end but costs almost nothing.
Paint your nails with regular black polish and let them dry fully.
Apply star stickers onto the nail — these act as masks.
Then brush a matte top coat over the entire nail, covering both the sticker and the surrounding polish.
While the matte coat is still slightly wet, carefully peel off the star stickers using tweezers.
The area underneath stays glossy while the rest goes matte.
The result? Shiny star shapes popping out of a velvety matte background. It’s a gorgeous contrast.
DIY example: Make your own star stencils by cutting star shapes out of regular scotch tape with small scissors or a craft punch. This costs literally nothing.
The key is to peel the stickers off before the matte coat dries completely. If you wait too long, the edges won’t be clean.
This works best on medium to long nails where the star shape has room to breathe.
Edgy, modern, and surprisingly easy. Five stars for this five-pointed design.
13. Lavender Nails With Iridescent Stars
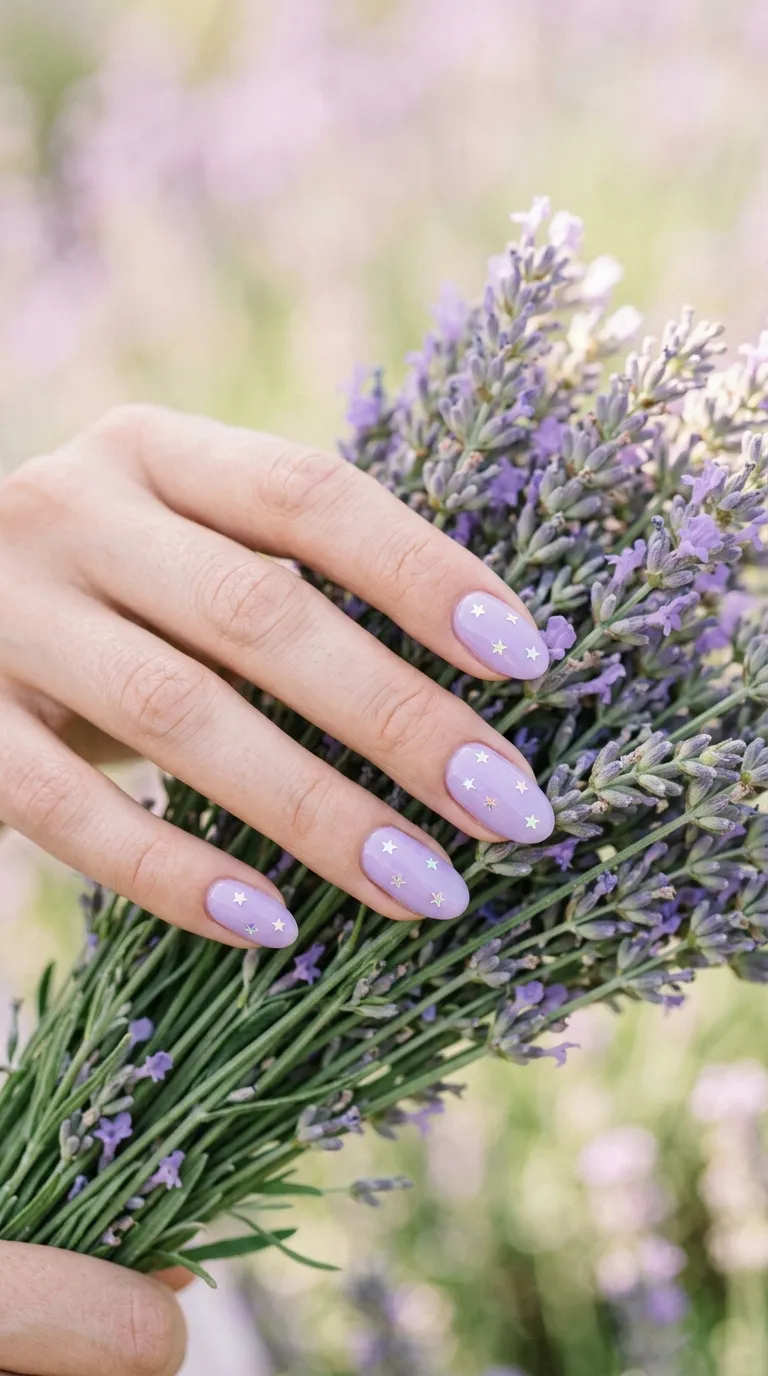
Lavender is one of the trendiest nail colors right now, and iridescent stars take it to another level.
Apply two coats of creamy lavender polish across all nails.
While the second coat is still wet, use tweezers to place small iridescent star sequins across each nail.
Scatter them randomly — two on some nails, four on others.
Iridescent sequins shift between pink, blue, and green depending on the angle, which pairs beautifully with the cool lavender tone.
Budget tip: Iridescent star sequins are sold in large bags at craft stores for about one dollar. You’ll have enough for fifty-plus manicures from a single bag.
Press each sequin gently into the wet polish, then lock everything down with two thick coats of glossy top coat.
This design screams spring — think Easter brunch, garden parties, and weekend farmers’ markets.
It takes about fifteen minutes and requires zero artistic ability.
If you can place a sticker, you can do this design.
Keep your nails short to medium-length for the most wearable version of this look.
14. Star Nails Using Hole Punch Stencils
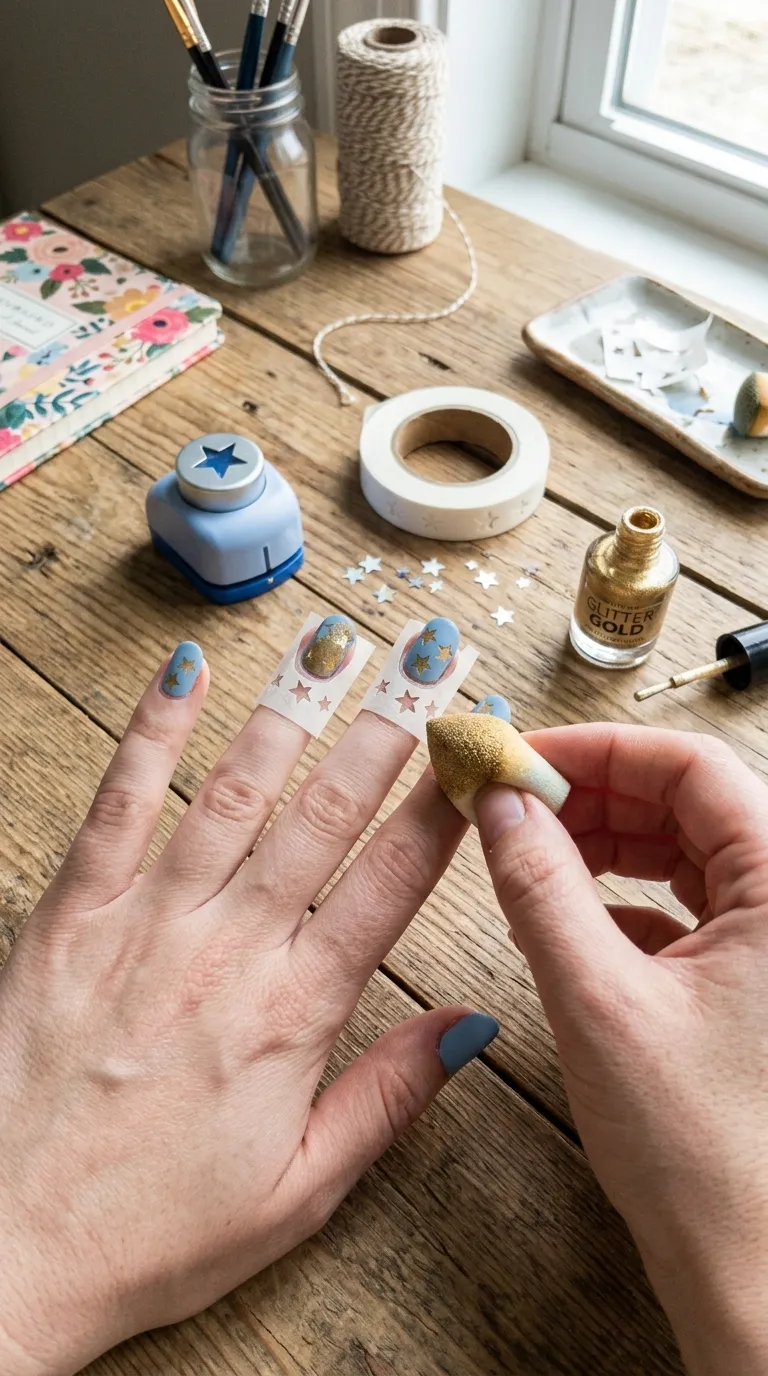
Here’s a dead-simple DIY hack that gives you perfectly shaped stars every single time.
Take a piece of regular tape — masking tape or painters tape works best because it’s less sticky.
Use a small star-shaped craft punch (about three dollars at any craft store) to punch star shapes out of the tape.
Paint your nails in your base color and let them dry completely.
Press the punched tape onto the nail, positioning the star cutout where you want it.
Paint a contrasting color over the entire tape.
Peel the tape off while the polish is still wet.
You’ll have a perfect, crisp star shape in the contrasting color.
DIY example: White base with a gold star. Black base with a neon pink star. Nude base with a red star. The combinations are endless.
This technique is foolproof even for total beginners.
The craft punch does all the hard work — your stars come out clean and symmetrical every time.
Total investment: about three dollars for the punch plus tape you already have at home.
15. Shooting Star Nail Design
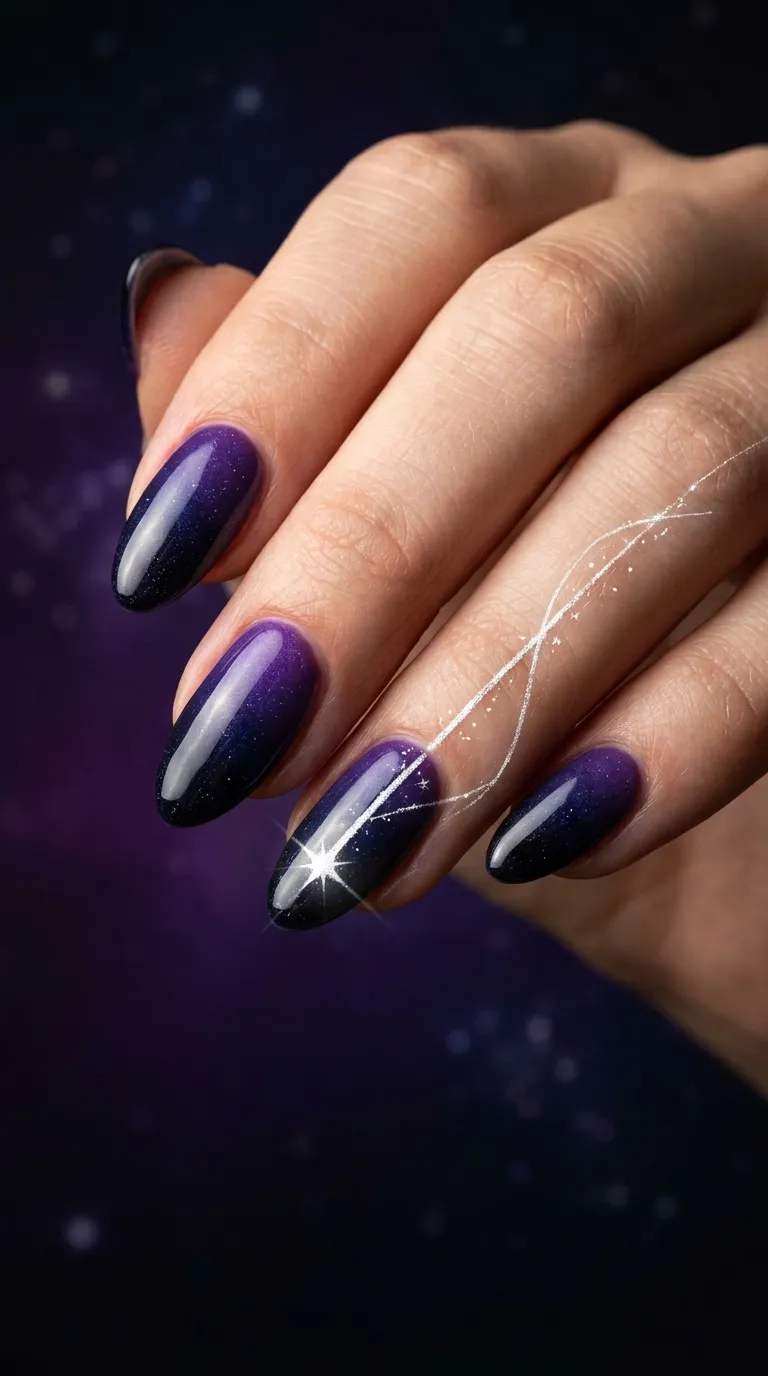
Add some movement to your nail art with a shooting star design.
Paint your base in a dark color — deep purple, navy, or black all work well.
Using a thin nail art brush dipped in white or silver polish, draw a small star on one side of the nail.
Then drag a thin, tapered line away from it at an angle, like a comet trail.
Add two or three even thinner, shorter lines alongside the main trail for a sense of speed and sparkle.
The trick is to keep the brush barely touching the nail as you drag the line — this creates a naturally thin, tapered trail.
Budget tip: Thin nail art brushes are sold in sets of five to ten for under three dollars. They’re reusable and work for dozens of different designs beyond just stars.
You can do the shooting star on one accent nail or repeat it across all ten for full celestial drama.
A glossy top coat makes the white trail shimmer beautifully against the dark base.
This is a twenty-minute design that looks like it took an hour of painstaking detail work.
16. Star Nails With Chrome Powder
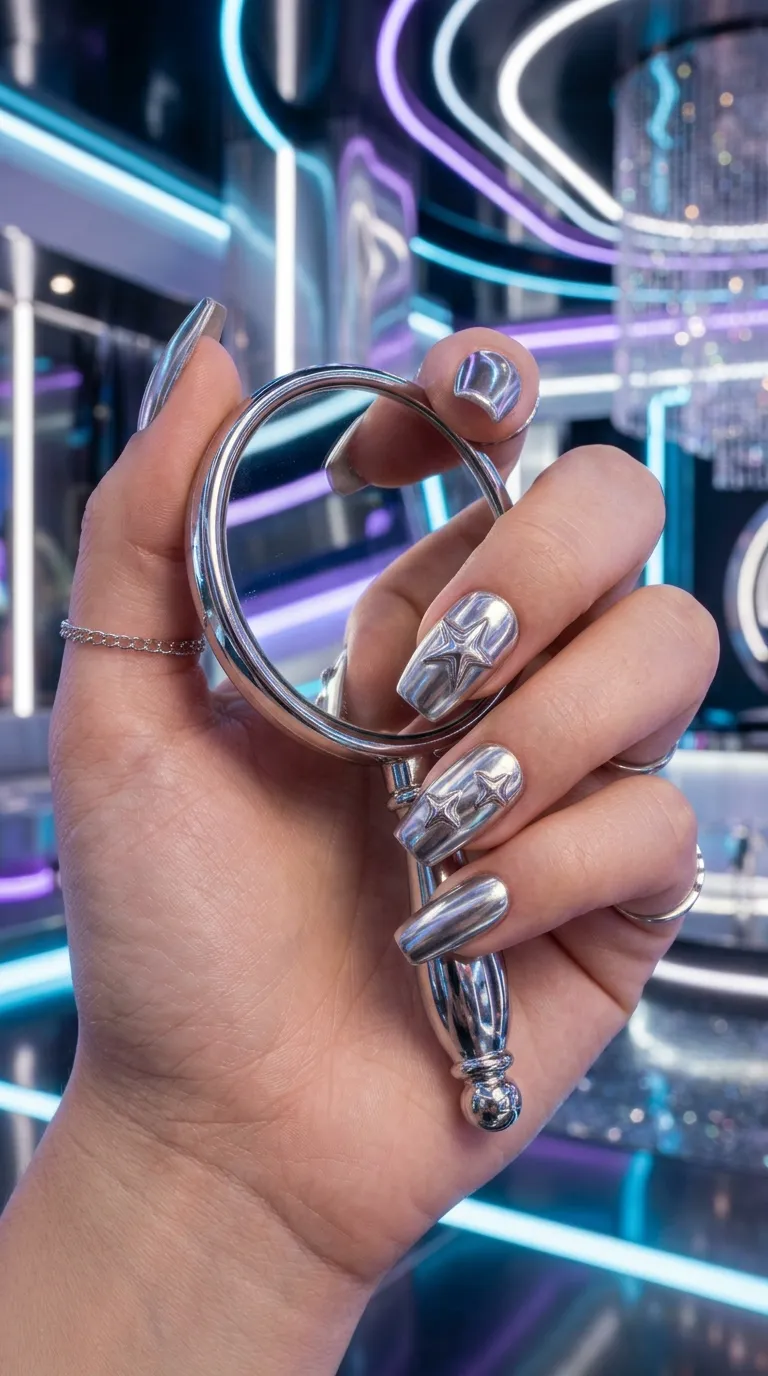
Chrome powder has taken the nail world by storm, and it’s way easier to use than you’d think.
Apply a gel base coat (you’ll need a small UV or LED lamp for this — basic ones cost under fifteen dollars).
Cure the base, then apply a no-wipe gel top coat and cure again.
While the surface is still smooth and warm, use a silicone applicator or your fingertip to rub chrome powder onto the nail in circular motions.
The powder bonds to the gel and creates a mirror-like finish.
For the star element, apply star stickers before the chrome step on your accent nails. After rubbing the chrome powder, peel them off to reveal the base color underneath in star shapes.
Budget tip: Chrome powder kits with multiple colors start at about five dollars online. One jar lasts forever since you only use a tiny pinch per nail.
The final look is futuristic, high-fashion, and completely different from regular polish.
People will genuinely ask if you got these done professionally.
17. Glow-in-the-Dark Star Nails
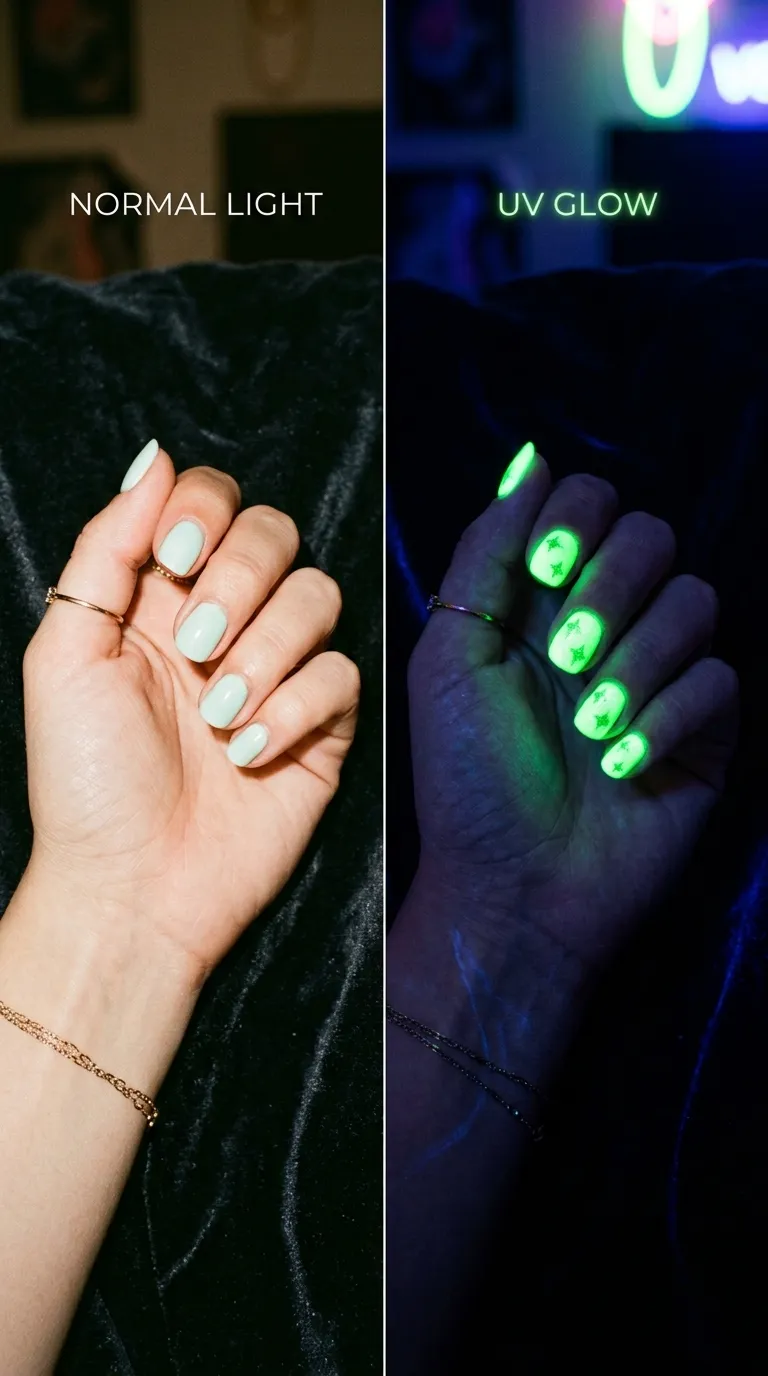
Yes, glow-in-the-dark nail polish exists — and it’s incredibly fun for festivals, Halloween, and themed parties.
Apply a white base coat first, since glow polish shows up brightest over white.
Then add two coats of glow-in-the-dark polish. These are sold online and at beauty supply stores for about four dollars a bottle.
For the star element, use glow-in-the-dark star stickers (find them in the kids’ section at dollar stores) cut down to nail size, or paint star shapes using a second glow-in-the-dark shade.
In regular light, these nails look like a subtle milky white or pale green.
Turn off the lights, and they light up like a constellation.
DIY example: Layer regular glow polish as the base, then add glow star stickers in a different glow color (some glow blue, others green). This creates a two-toned glow effect.
Charge the glow by holding your nails under a lamp or flashlight for thirty seconds.
The glow lasts for several hours and recharges in any light.
An absolute conversation starter at parties. Kids love this one too.
18. Starry Night Inspired Nail Art
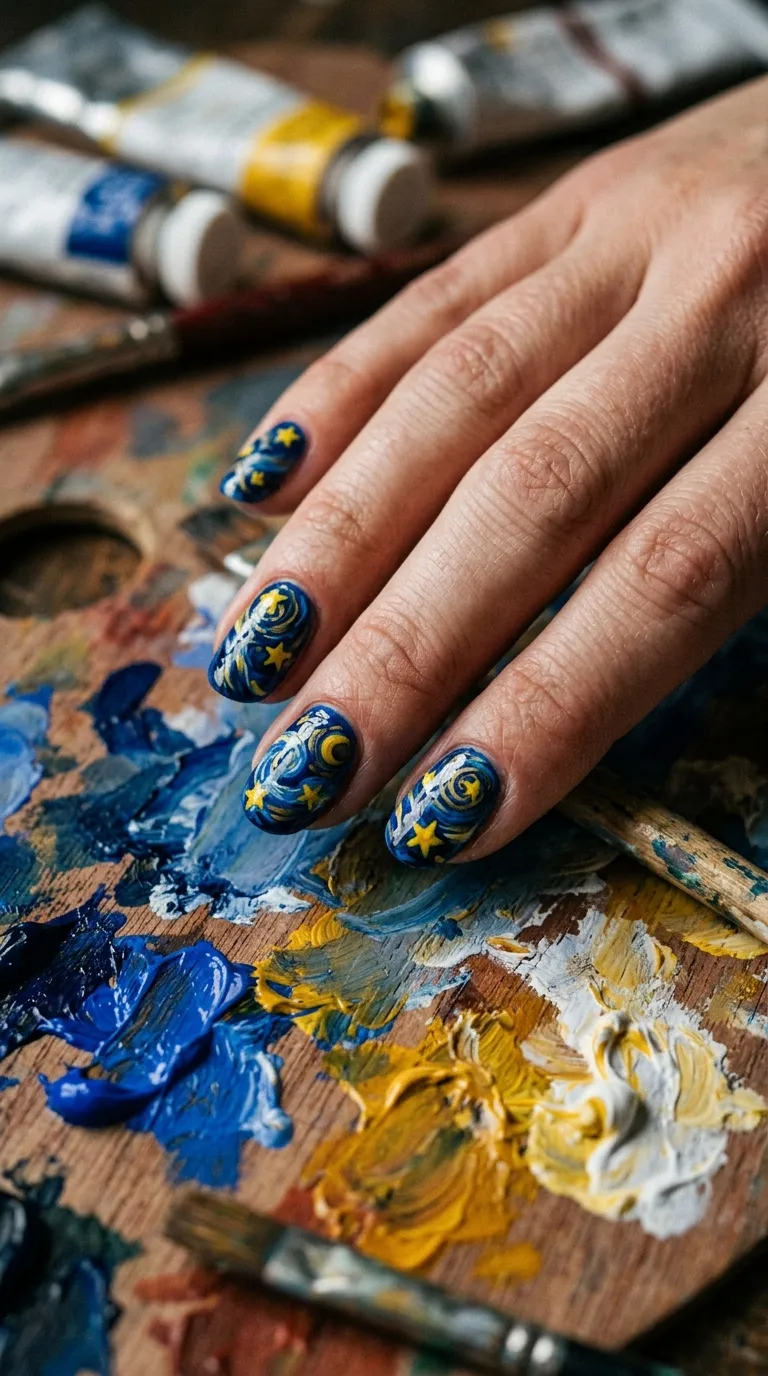
Channel your inner Van Gogh with this art-inspired nail design.
Use a dark blue or teal polish as your base coat.
While it’s still wet, take a thin brush dipped in yellow polish and create small swirling circles across the nail — these represent the iconic swirling sky.
Add a few bright yellow star dots with radiating short lines around them to mimic the painting’s signature stars.
You don’t need to be an artist. The beauty of this style is that messy swirls look even more authentic to the original painting.
Budget tip: Use acrylic craft paint (the kind in small tubes for under a dollar) for the detail work instead of nail polish. Acrylic paint is easier to control with a fine brush and dries quickly on top of a polish base.
Seal everything with a glossy top coat to protect the design.
This look gets attention everywhere you go.
It’s wearable art on your fingertips — and people will be genuinely impressed that you did it yourself at home.
Time investment: about thirty minutes. Worth every second.
19. White Nails With Black Star Outlines
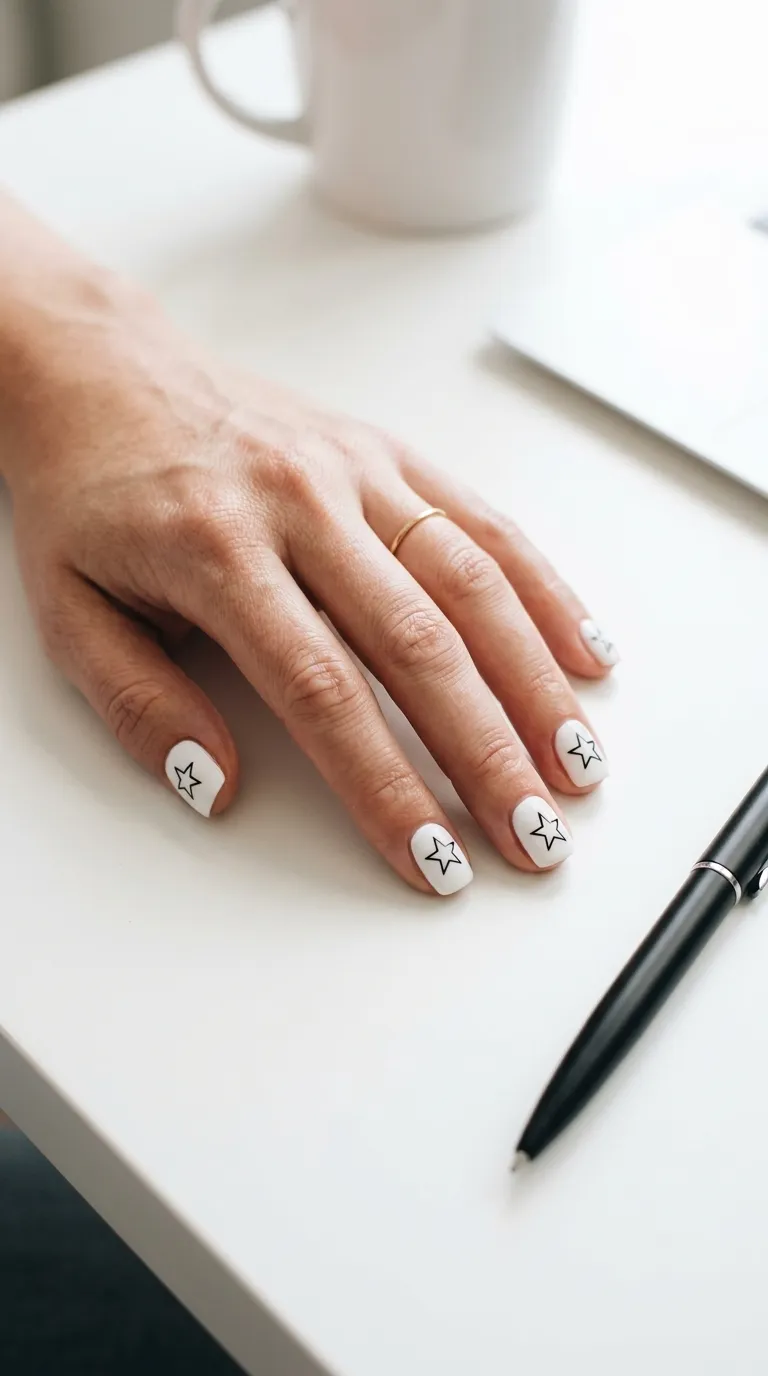
Minimalist nail art lovers, this one’s for you.
Apply two coats of crisp white polish on all nails.
Using a thin black nail art brush or a fine-point permanent marker (yes, this works on nails), draw the outline of a star on each nail. Don’t fill it in — just the geometric outline.
Keep the stars slightly different sizes on each nail for a more relaxed, hand-drawn feel.
A fine-tip Sharpie or felt pen works surprisingly well on dried nail polish. Just draw your star, wait a moment for the ink to set, and seal with a clear top coat immediately.
DIY example: Practice drawing star outlines on a piece of paper first. Once you’ve got the five-pointed shape down, transfer that muscle memory to your nails.
This design is graphic, modern, and super clean.
It’s perfect for people who love nail art but prefer a quieter, more sophisticated aesthetic.
Budget tip: A single fine-point Sharpie costs less than two dollars and gives you a tool for tons of different line-art nail designs beyond just stars.
20. Ombre Sunset Nails With Evening Stars
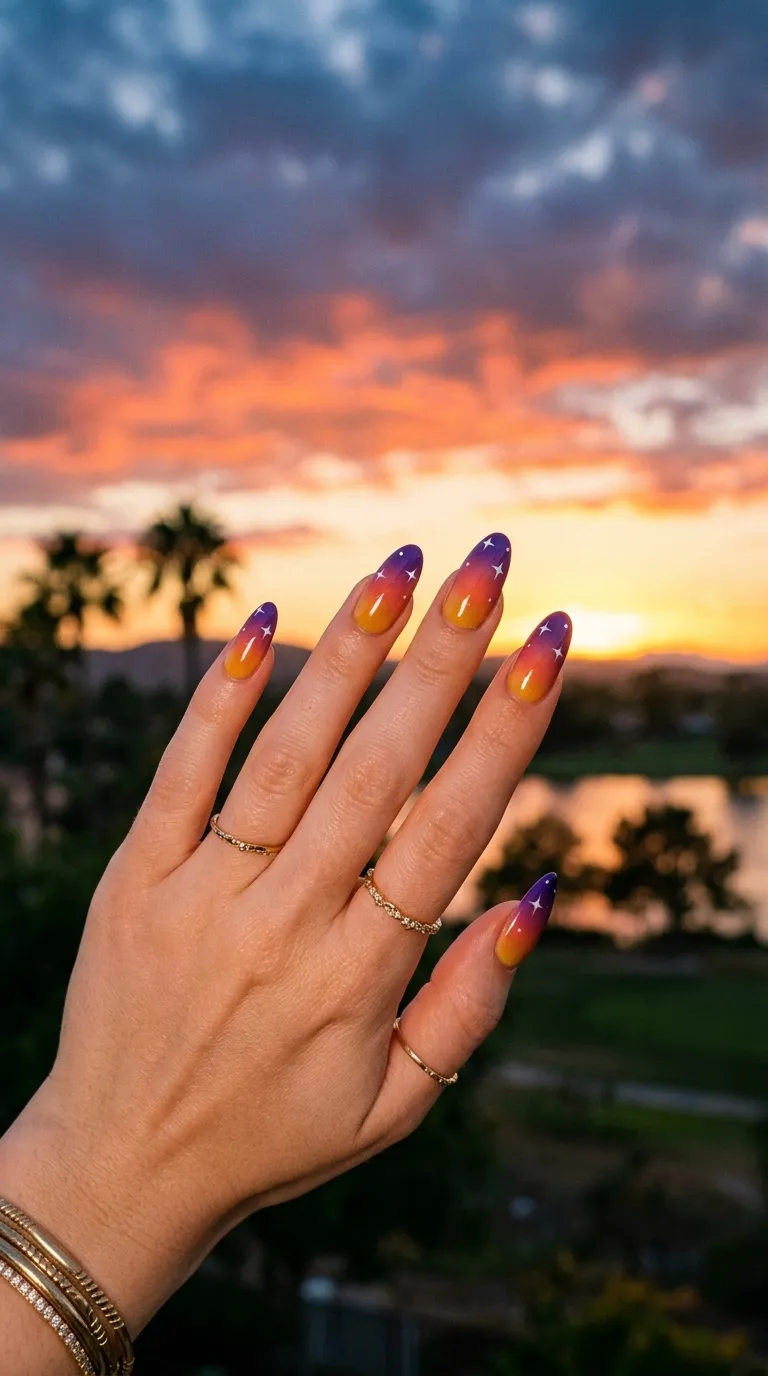
Bring a sunset to your fingertips and add stars as the night sky takes over.
Start by applying a golden yellow polish at the base of each nail.
Use a makeup sponge to dab orange, then coral, then deep purple in layers toward the tip of the nail.
Blend them by lightly patting the sponge over the transitions.
Once the gradient is dry, use a dotting tool to add tiny white stars across the purple tip area — like the first stars appearing in an evening sky.
The gradient technique is forgiving. Colors don’t need perfect borders — that’s what makes it look like a real sunset.
Budget tip: You only need four polish colors and a kitchen sponge. Tear the sponge into small pieces and dab away. Clean-up around the nail edges is easy with a small brush dipped in nail polish remover.
This design is a showstopper at summer barbecues, beach vacations, and outdoor events.
It takes a little more time — about thirty-five to forty minutes — but the payoff is a wearable watercolor sunset on every nail.
21. Negative Space Star Nails
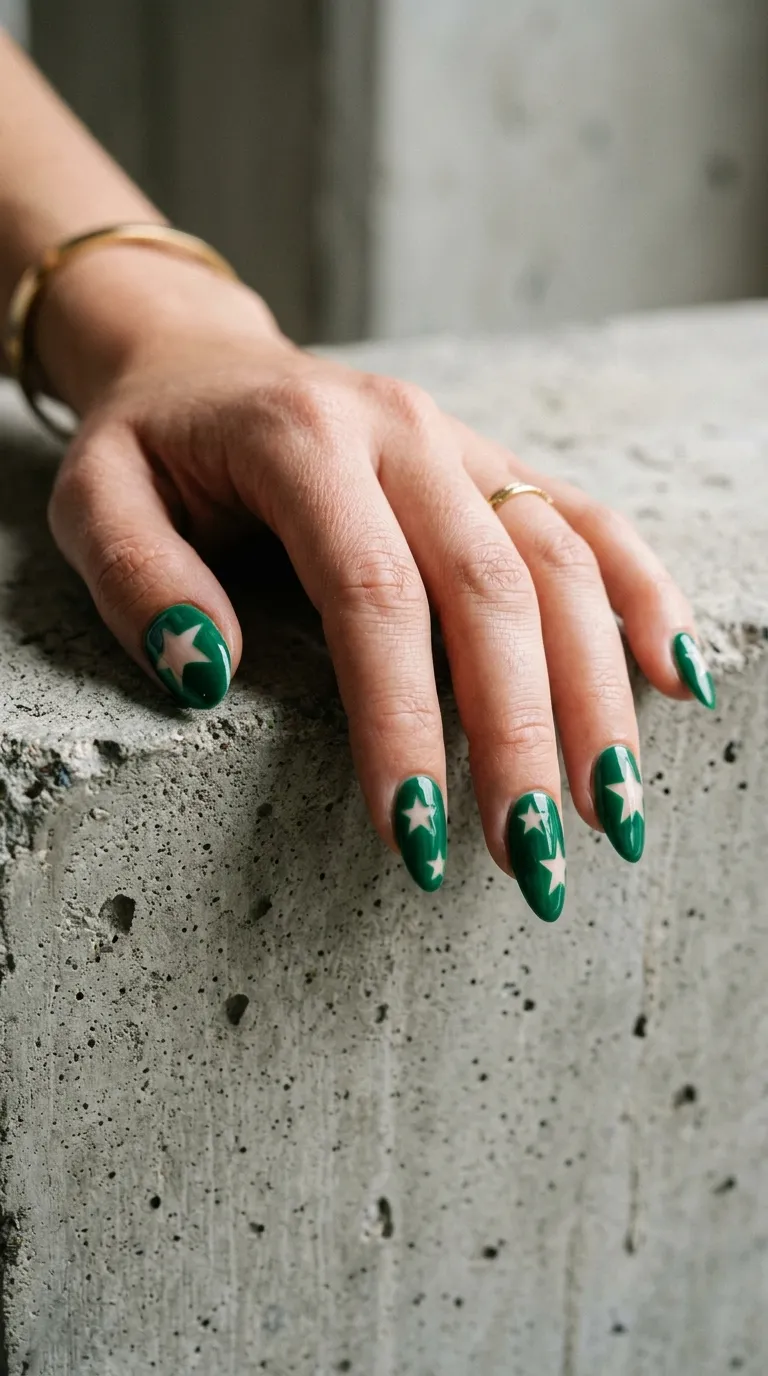
Negative space nail art leaves parts of your natural nail exposed on purpose — and it looks incredibly cool.
Paint your nails in a bold, opaque color like emerald green, deep red, or royal blue.
Before the polish dries, place star-shaped stickers on the nail.
These stickers block the polish from reaching the nail underneath.
Once the polish is fully dry, peel the stickers off.
You’ll see your natural nail showing through in perfect star shapes against the colored background.
The bare nail creates a window effect that’s modern and unexpected.
DIY example: Use the star-shaped craft punch method from tip fourteen — punch stars out of tape, stick them on the bare nail, paint over, and peel.
Budget tip: This design actually uses less polish than a regular manicure since you’re intentionally leaving areas bare. Saves polish and looks better — a win-win.
Apply a clear top coat over everything to give the bare areas a matching sheen.
This works best on healthy, well-groomed natural nails since the bare areas are visible.
A quick buff before you start makes a big difference.
22. Rhinestone Star Cluster Nails
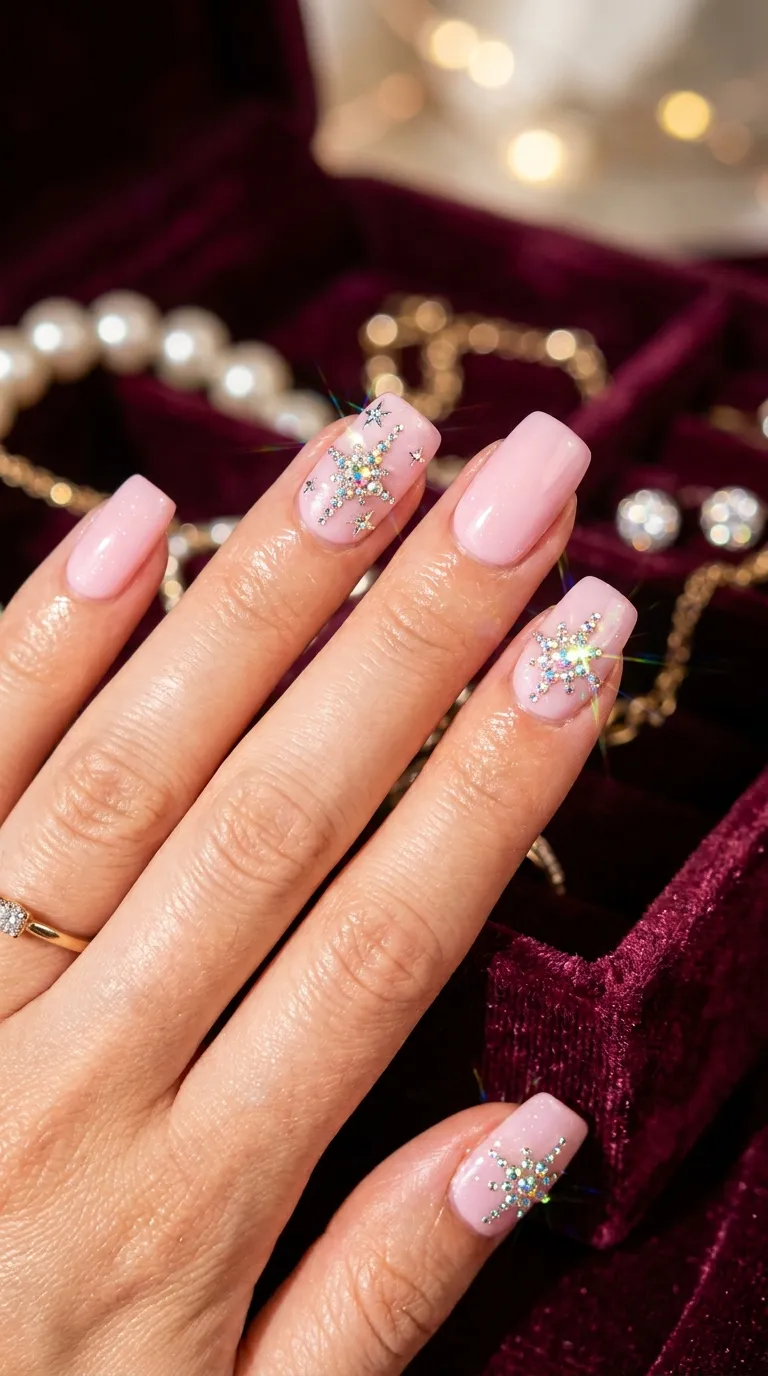
For maximum sparkle with a designer look, rhinestone star clusters are the way to go.
Paint your nails in a soft neutral — pink, peach, or nude.
On one or two accent nails, arrange tiny flat-back rhinestones in a star pattern.
Place one rhinestone in the center, then five around it at the points of a star shape.
Use a dab of clear nail glue or gel top coat to secure each stone.
Press them down firmly and let the adhesive set before applying a final top coat around (not over) the stones.
Budget tip: Flat-back rhinestones are sold in massive packs of five hundred or more for about three dollars at craft stores or online. One pack lasts for years of nail art.
The cluster design means you don’t need rhinestones on every nail — just one or two accent nails carry the whole look.
This is the design to choose for weddings, galas, proms, or any special event where you want your nails to genuinely sparkle under the lights.
Pair with a matching rhinestone ring for extra coordination.
23. Star Nails With Nail Wraps (Zero Skill Needed)
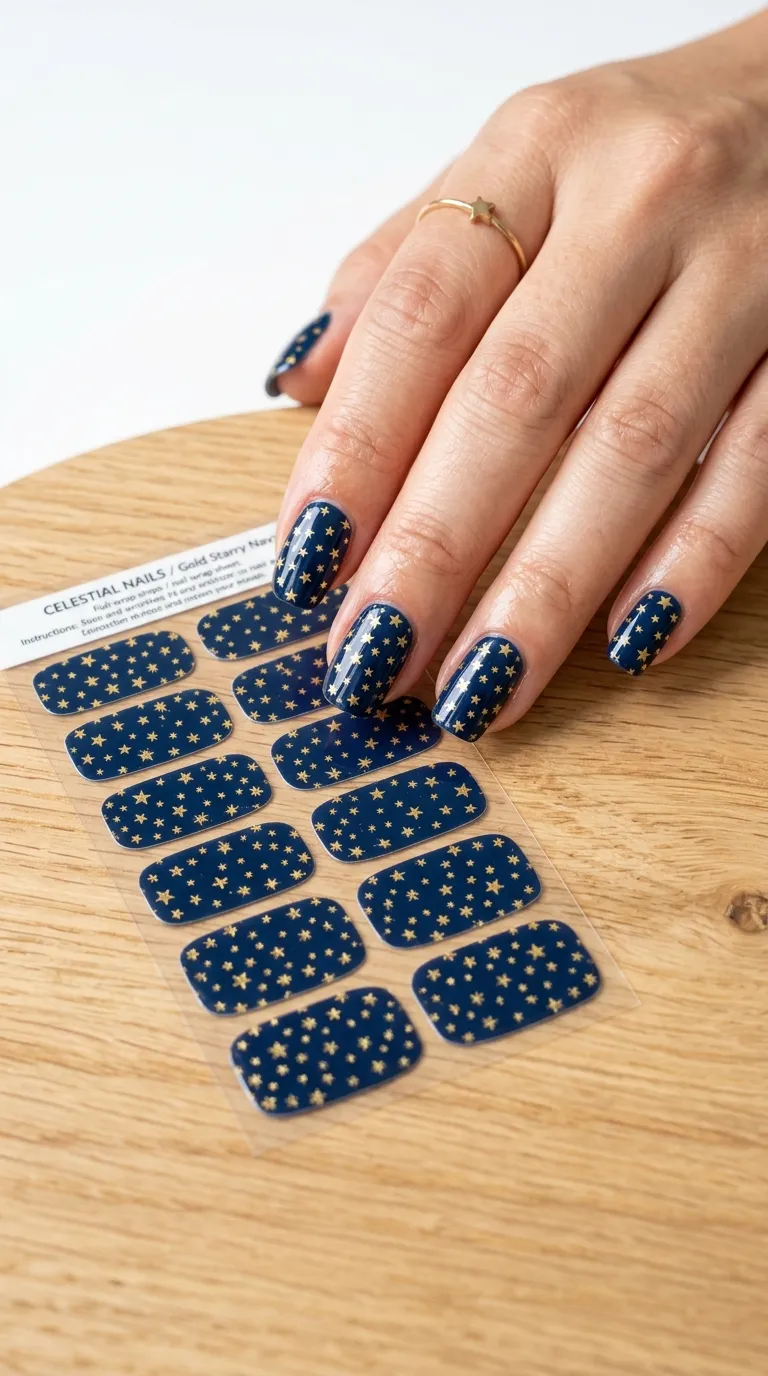
If you want star nails with absolutely zero artistic skill required, nail wraps are your best friend.
These are pre-printed adhesive strips that you press directly onto your nail and trim to fit.
Peel a wrap strip from the sheet, warm it between your fingers for a few seconds, and press it onto a clean, dry nail starting from the cuticle.
Smooth out any air bubbles with your thumb.
Fold the excess over the tip and file it off with a nail file.
That’s it. Perfect star nails in about ten minutes, no painting required.
Nail wraps come in hundreds of designs — tiny gold stars, scattered constellations, holographic star patterns, and more.
Budget tip: Brands like Color Street, Dashing Diva, and generic Amazon nail wraps range from three to eight dollars per set. Each set includes enough strips for two full manicures.
Wraps last five to seven days with normal wear and peel off easily without damaging your nails.
This is the absolute easiest entry point for anyone who wants gorgeous star nails but doesn’t trust themselves with a brush.
Conclusion
Star nail designs are one of the most fun and accessible ways to add personality to your hands without spending salon prices. Every design on this list can be done at home with drugstore polish, dollar-store supplies, and basic tools you probably already own. Whether you’re into bold galaxy themes, subtle single-star accents, or effortless peel-and-press wraps, there’s a star nail look here that fits your style, your skill level, and your budget. Pick one design, grab your supplies, and give yourself thirty minutes this weekend. Your nails — and your wallet — will thank you. Now go make those fingertips sparkle.