26 Elegant Vintage Star Nail Designs Collection for Retro Vibes
 By VelvetNesty

There’s something magnetic about vintage nail art that never quite fades from style. Star motifs paired with retro palettes — think dusty roses, burnt oranges, deep teals, and creamy ivories — create a look that feels both nostalgic and completely on-trend. Whether you’re heading to a themed party, a weekend brunch, or just want your nails to spark a little joy, vintage star designs deliver personality without trying too hard. The best part? Most of these looks are totally doable at home with a few basic tools and a steady hand. From old Hollywood glamour to groovy ’70s energy, this collection of 26 elegant vintage star nail designs covers every retro mood you could ask for. Grab your favorite polish and let’s get into it.
- Dusty Rose Stars on Cream Base
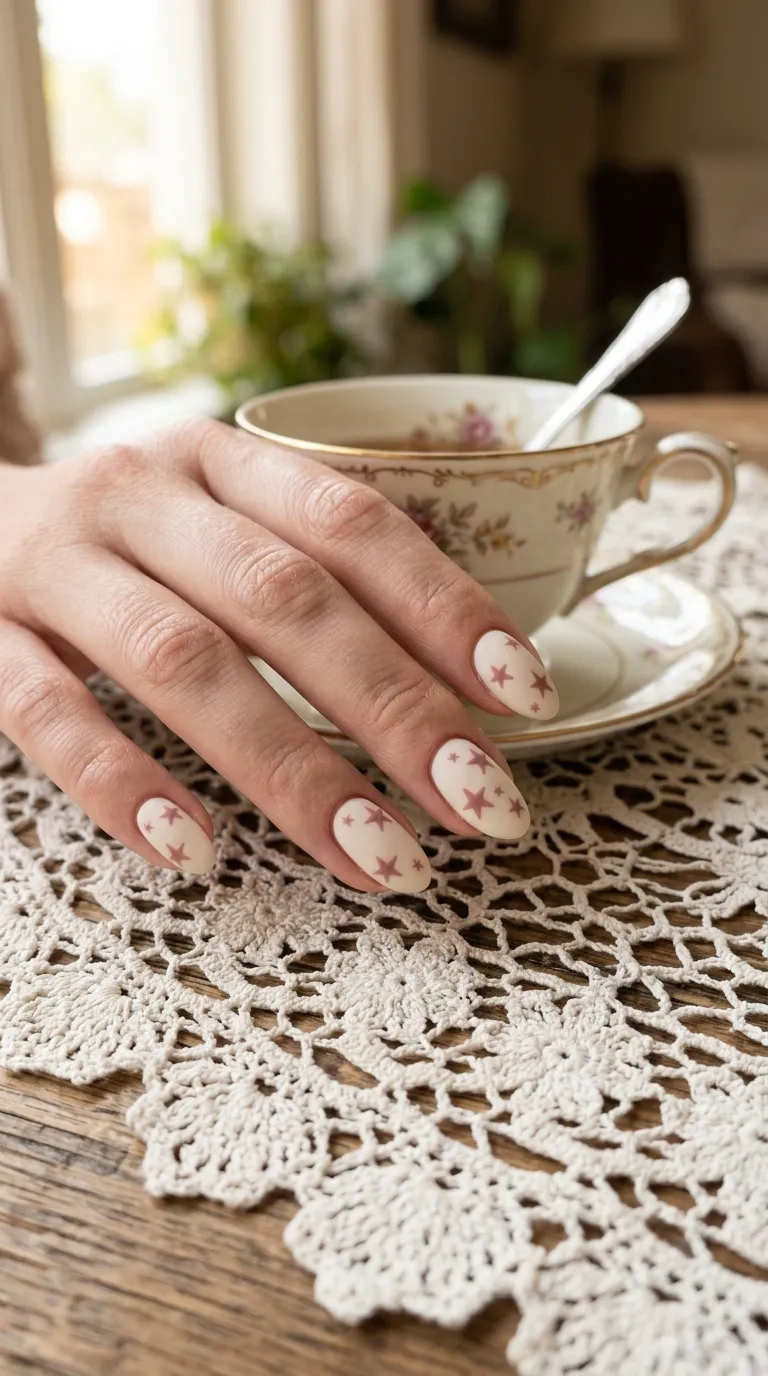
Start with a creamy off-white base coat on all nails. Let it dry completely — patience matters here.
Use a thin nail art brush dipped in a muted dusty rose polish. Paint small five-point stars scattered across each nail. Keep them different sizes for a more natural, hand-stamped look.
You don’t need perfection. Slightly uneven stars actually add to the vintage charm.
A matte top coat finishes this off beautifully. It gives that old-world, faded-print vibe that screams retro.
Budget tip: Dollar store acrylic paint works just as well as expensive nail art polish for the stars. Just seal everything with a good top coat.
This design pairs wonderfully with soft knit sweaters and gold jewelry. It’s quiet, feminine, and easy to maintain for a full week.
If stars feel tricky freehand, try using a toothpick. Dip the rounded end into polish and dot five points in a circle, then connect them. Done.
Total cost if you already own a base color: under $3.
- Gold Foil Stars on Deep Burgundy

This one gives serious old Hollywood energy. Think velvet gloves and chandelier lighting.
Paint all nails in a deep burgundy — two coats for full opacity. While the second coat is still slightly tacky, press small pieces of gold foil onto each nail.
You can cut foil into rough star shapes beforehand using tiny craft scissors. They don’t need to be perfect. Irregular edges look more authentic and artsy.
Seal everything with a glossy top coat. The shine makes the gold pop against that dark base.
DIY hack: Grab gold leaf sheets from a craft store — a pack of 100 sheets costs about $5 and lasts forever.
This design works beautifully for date nights, holiday dinners, or any time you want your hands to look expensive without the salon price tag.
The burgundy-and-gold combo is timeless. It references 1940s glamour while still feeling modern enough for everyday wear.
Pro move: add one accent nail where the entire surface is covered in gold foil. It breaks up the pattern and adds drama.
- Pastel Blue With White Star Outlines

This gives sweet 1950s diner vibes — like a jukebox and a milkshake wrapped into one manicure.
Apply two coats of baby blue polish. Let each coat dry fully before moving on.
Using a fine-tip nail art pen in white, draw star outlines on each nail. Just the outline — no fill. This keeps it airy and delicate.
Place stars at different angles. Some near the cuticle, some at the tip. Random placement looks more playful.
Money saver: White gel pens from the office supply aisle can work in a pinch. Just cover with top coat immediately to seal the ink.
This is a fantastic spring and summer look. It’s light, cheerful, and goes with denim, white dresses, and canvas sneakers.
The pastel blue reads vintage without being too costume-y. It’s wearable for work, school, or casual outings.
If you want extra retro flair, add a tiny dot in the center of each star using the same white pen. Small detail, big impact.
4. Black and Silver Star Explosion

Channel your inner rock-and-roll queen with this bold combo.
Two coats of jet black polish set the stage. Make sure it’s completely opaque — no streaks.
Use silver star-shaped nail stickers or sequins. Press them onto the wet top coat so they sink in and stay put. Scatter them randomly — some nails get three stars, some get one.
Finish with a thick glossy top coat to lock everything in place.
Budget find: Star-shaped confetti from party supply stores works perfectly as nail art. A bag costs about $1 and contains hundreds of tiny stars.
This design screams late ’70s glam rock. Think leather jackets, platform boots, and smoky eyeliner.
It’s surprisingly wearable for everyday life too. The silver catches light beautifully and draws compliments without being overwhelming.
For a twist, try this on just your ring fingers and keep the rest solid black. The contrast makes those star-covered nails the center of attention.
Removal tip: peel-off base coat underneath makes taking off glitter designs painless.
5. Terracotta Retro Star Stamps

Earthy tones meet celestial shapes in this cozy design.
Start with a warm terracotta base. This shade instantly reads as ’70s bohemian.
For the stars, mix a slightly darker shade — add a drop of brown to your terracotta polish on a palette. Use a stamping plate with star patterns if you have one. If not, a thin brush works fine.
The stamped effect should look slightly imperfect, like a worn textile print. That’s the whole point.
Thrifty tip: Nail stamping plates cost $2–4 online and come with multiple designs you’ll reuse dozens of times.
This pairs perfectly with macramé, earth-tone outfits, and turquoise jewelry. It’s the definition of boho-chic nails.
The terracotta family of colors flatters every skin tone, which makes this a universally wearable choice.
Try adding one accent nail in solid cream to break up the warmth. It mimics the look of vintage desert postcards.
This manicure lasts well on shorter nails too, so don’t worry if you keep yours trimmed.
6. Mint Green Stars With Cherry Accents
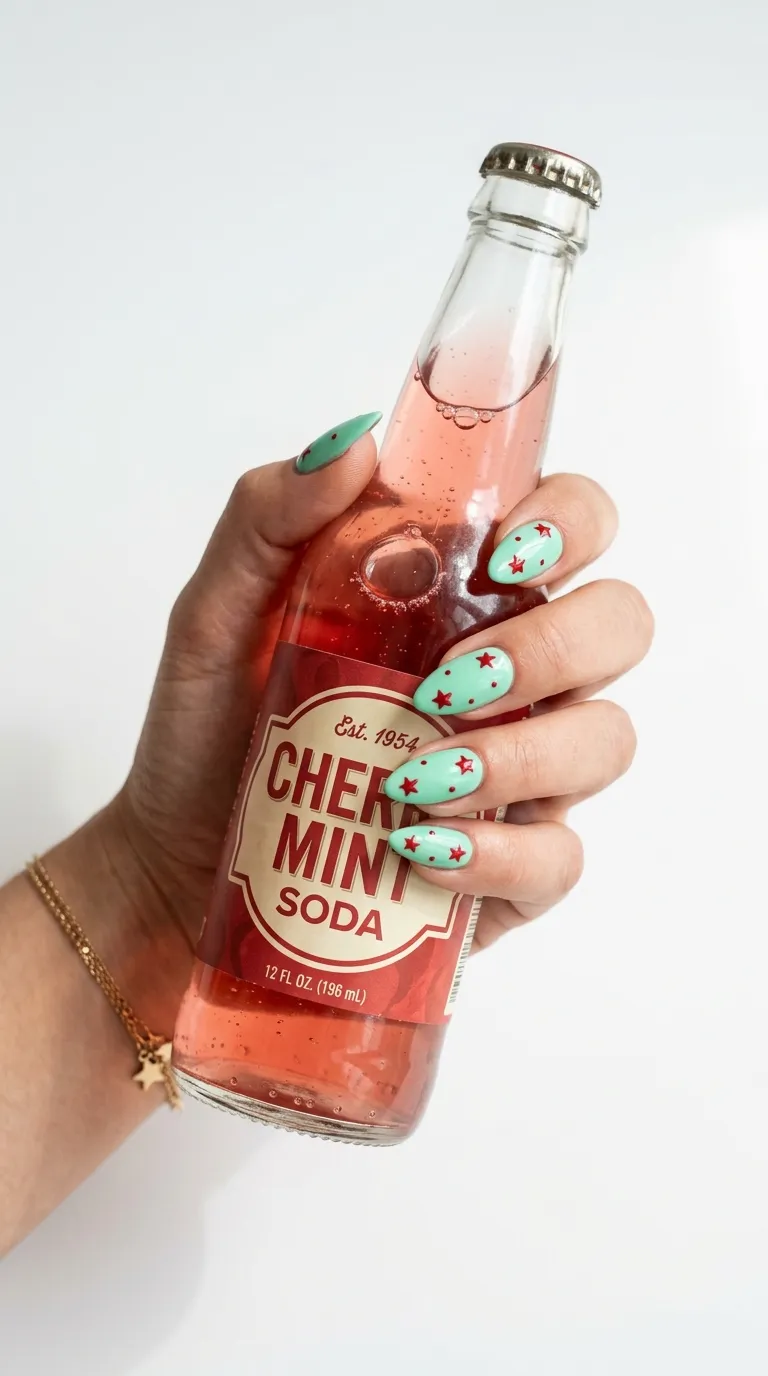
This color pairing screams 1950s soda fountain in the best possible way.
Paint your nails in cool mint green — two even coats. Let it dry until it’s no longer tacky.
Add cherry red mini stars using a dotting tool or thin brush. Place two or three per nail, keeping them small and scattered.
Between the stars, add tiny red dots for extra retro flair. Think polka dots meet starry night.
Save money: Instead of buying a dotting tool, use the end of a bobby pin. It creates perfectly round dots every time.
This design is pure fun. Wear it to picnics, vintage fairs, brunches, or any day that needs a mood lift.
The mint-and-cherry combo also photographs beautifully for social media. Those colors pop on camera.
For a slightly more subtle version, use the cherry red only on your thumb and ring finger. Keep the other nails solid mint.
Pair this with red lipstick and a polka-dot headband for full vintage commitment. Or just let the nails speak for themselves.
7. Navy Blue Celestial Star Map

Turn your nails into a miniature night sky with this constellation-inspired design.
Apply two coats of deep navy blue. This shade looks rich and sophisticated on its own, and it’s the perfect canvas for stars.
Using a gold nail art pen, place tiny dots in constellation patterns. Connect some dots with thin lines to mimic actual star maps. Orion, the Big Dipper — or just make up your own.
Affordable hack: A fine-point gold Sharpie paint marker works surprisingly well for this. Just seal it with top coat before it smudges.
This design appeals to anyone who loves astronomy, astrology, or just a moody aesthetic.
It looks incredible under low lighting — the gold catches candlelight and creates a subtle shimmer.
Keep the star placement sparse. Too many dots and you lose the map effect. Think minimalist celestial, not glitter bomb.
This works best on longer nails where you have more surface area to create the pattern. But short nails can rock a simpler version with just two or three connected stars per nail.
Perfect for winter evenings and cozy nights out.
8. Retro Red With Cream Star Tips

A vintage twist on the classic French manicure — starring stars instead of a plain white line.
Paint all nails in classic red. Two coats, fully dried.
Instead of the traditional French tip, place cream-colored stars along the tip of each nail. Overlap them slightly so they form a star-studded border.
This little swap turns a standard manicure into something people actually notice and remember.
Budget move: Use star-shaped hole punch reinforcement stickers as guides. Paint over them, peel off, and you’ve got clean star shapes.
The red-and-cream palette is timeless Americana. It works for Fourth of July, Valentine’s Day, or just a Tuesday when you want to feel cute.
This is also a great design if you’re just starting with nail art. The stars along the tip are forgiving because the natural nail edge helps guide your placement.
Add a glossy top coat for a polished diner-girl finish. Or go matte for a more understated, editorial look.
Either way, this one gets compliments.
9. Lavender Fields With Scattered Stars

Lavender is having a major moment, and pairing it with stars makes it feel vintage rather than trendy.
Apply two coats of a soft lavender polish. This shade works on every nail length and shape.
Scatter tiny silver stars across each nail while the top coat is still wet. Use tweezers to place them — your fingers will thank you.
Keep the placement random and sparse. Three to five stars per nail is the sweet spot.
Penny-pincher tip: Buy a bag of star-shaped craft glitter. Use tweezers to pick out individual stars and place them on your nails. A $2 bag lasts for years.
This design feels dreamy and whimsical. It’s perfect for spring weddings, garden parties, or lazy Sunday self-care sessions.
The lavender-and-silver combo has a soft fairy-tale quality that’s romantic without being over-the-top.
For extra vintage charm, use an iridescent top coat instead of clear. It adds a subtle rainbow shimmer that catches light at different angles.
This is one of the easiest designs on this list. If you can paint your nails and use tweezers, you can do this.
10. Mustard Yellow Retro Star Clusters

Mustard yellow instantly transports you to the 1970s — add stars and you’ve got a groovy masterpiece.
Paint all nails in a rich mustard yellow. This shade looks warmer and more sophisticated than bright yellow.
On your ring finger and index finger, paint clusters of small stars in brown and burnt orange. Group three or four stars together so they look like little constellations.
Leave the other nails plain mustard for balance.
DIY shortcut: Use the tip of a mechanical pencil (without lead) dipped in polish to stamp tiny star shapes. The small opening creates a natural star-like impression.
This screams vintage road trips, vinyl records, and sunset drives. It’s the nail equivalent of a classic rock playlist.
Mustard flatters warm and deep skin tones beautifully. If you have cooler undertones, try a slightly more golden version.
Pair this with flared jeans, chunky rings, and a suede bag for a full retro outfit moment.
The clustered approach means less work than covering every nail in stars. Focused effort, maximum style payoff.
11. Pearl White With Holographic Stars

This design bridges vintage elegance and futuristic sparkle in one gorgeous manicure.
Start with a pearl white shimmer polish. The shimmer gives it that vintage vanity-table glow.
Apply holographic star decals once the base is dry. These decals shift colors as they catch light — rainbow, pink, blue, green — all from one sticker.
Place one statement star on each nail for a clean look. Or cluster a few on your accent nails.
Where to save: Holographic nail stickers come in sheets of 50–100 for under $3 on most online retailers. One sheet covers multiple manicures.
This is a showstopper for parties and special events. The holographic shift catches every light source in the room.
Despite looking complex, this takes about 15 minutes total. Paint, stick, seal, done.
The pearl base keeps things grounded in vintage territory. Without it, holographic stars might look too futuristic. The combination of old and new is what makes this work.
Finish with a high-shine top coat to protect the decals and amplify the holographic effect.
Wear this to any event where you want your nails to start conversations.
12. Olive Green Military Star Accents

Military-inspired vintage never goes out of rotation, and this nail design proves it.
Paint your nails in matte olive green. Use a matte top coat if your olive polish is glossy — the matte finish is key to selling the military look.
Place one white star in the center of each nail. Keep them uniform and centered. This is about clean, no-nonsense style.
Star stickers work best here. Freehand is fine, but the symmetry of stickers gives it that proper insignia quality.
Budget play: White star stickers are available in office supply stores as label decorations. They cost almost nothing and work perfectly on nails.
This design is gender-neutral, minimal, and cool. It works for anyone who appreciates utility-inspired fashion.
Pair it with cargo pants, a white tee, and combat boots. Or contrast it with a flowy dress for an unexpected mix.
The olive-and-white palette is incredibly easy to maintain. Chips and wear actually add to the rugged aesthetic rather than ruining it.
This is a low-maintenance, high-impact manicure that lasts longer than most because the matte finish hides imperfections.
13. Coral Sunset Stars With Gradient Fade

Sunset colors on your nails feel like permanent golden hour — and the stars complete the sky.
Create a gradient from coral pink to soft peach using a small makeup sponge. Dab the two colors side by side on the sponge, then press onto each nail. Repeat two or three times for opacity.
Once dry, place tiny gold stars along the gradient transition line. This is where the two colors meet and fade, and the stars highlight that boundary beautifully.
Sponge tip: Cheap cosmetic wedge sponges from the dollar store work better than expensive ones. The finer texture creates smoother gradients.
This design captures vacation vibes, beach sunsets, and warm summer evenings.
Clean up the edges with a small brush dipped in nail polish remover. Sponge gradients are messy, but the results are worth it.
The gold stars add that vintage celestial touch that separates this from a basic gradient manicure.
Three to four stars per nail is plenty. Place them asymmetrically for a more organic, natural feel.
This pairs beautifully with flowy summer dresses and strappy sandals. Instant warm-weather mood.
14. Vintage Newspaper Print With Star Cutouts

Newspaper nails were a viral trend — now add star cutouts for a vintage editorial spin.
Paint your nails in a light grey or white base. Let it dry completely.
Dip a small piece of newspaper in rubbing alcohol and press it firmly onto your nail for about 15 seconds. The ink transfers onto the polish, creating that printed-text effect.
Before applying top coat, place star-shaped stickers on the nail. Paint over them with clear top coat, then peel the stickers off. This leaves star-shaped windows showing the natural nail beneath.
Cost cutter: You literally need a newspaper, rubbing alcohol, and stickers you already have. Total added cost: $0.
This design looks like it came from a high-end editorial photoshoot, but it’s one of the cheapest on this list.
The text pattern gives it a distinctly vintage, literary quality. The star cutouts add whimsy and dimension.
Works best on lighter skin tones where the natural nail contrast is visible. On deeper skin tones, try a cream base instead of the natural nail reveal.
Perfect for bookworms, writers, and vintage lovers alike.
15. Cherry Red and Black Rockabilly Stars

Rockabilly style is all about bold contrasts, and this nail design delivers exactly that.
Alternate your nails between cherry red and jet black. Paint each color on every other nail.
On the red nails, add black stars. On the black nails, add red stars. The contrasting colors make each star pop like crazy.
Keep the stars medium-sized — one per nail — for maximum impact.
Affordable approach: Two polishes and a thin brush is all you need. Skip the salon. This is a beginner-friendly design with professional-looking results.
This screams pin-up culture, hot rods, and rock-and-roll diners. It’s vintage with attitude.
The red-and-black palette works year-round and suits almost any occasion where you want to feel bold.
For extra rockabilly flair, add a tiny white highlight dot on each star. It creates a cartoon-like, tattoo-flash effect that’s very on-theme.
Pair with winged eyeliner, red lips, and a bandana. Or just let the nails do the talking.
This design stays visible and striking even as it starts to chip, which is a nice bonus.
16. Sage Green With Antique Gold Stars

Sage green feels like a walk through a vintage botanical garden — add gold stars and it’s pure magic.
Paint all nails in soft sage green. This muted, earthy green has been a favorite since the mid-century era.
Add antique gold stars using a thin brush and gold polish. Keep them small and place them near the base or side of each nail for an asymmetric layout.
Draw one or two fine gold lines extending from the stars, like shooting star trails.
Thrift hack: Antique gold acrylic paint from craft stores costs $1 and gives a richer, less shiny finish than metallic nail polish. Seal with top coat.
This pairs beautifully with linen outfits, wooden jewelry, and neutral palettes. It’s cottagecore meets celestial.
The muted tones make this incredibly wearable for everyday situations. It’s fancy enough for dinner but subtle enough for the office.
Sage green flatters warm and neutral skin tones particularly well. On cooler undertones, lean toward a slightly more blue-toned sage.
This design whispers elegance rather than shouting it. Sometimes that’s exactly what you want.
17. Champagne Shimmer With Rose Gold Stars

This is the design you reach for when you want to look polished without looking like you tried too hard.
Apply two coats of champagne shimmer polish. The micro-shimmer particles catch light in a way that’s subtle but radiant.
Place rose gold star decals at different angles across each nail. Vary the sizes — mix small and medium stars together.
The warmth of rose gold against champagne creates a monochromatic glow that looks expensive.
Smart spend: Rose gold star nail decals come in sheets for about $2 online. One sheet covers four or five manicures.
This is a perfect choice for weddings, anniversaries, or any celebration where you want understated glamour.
The champagne base reads as neutral, so it goes with literally every outfit and every season.
For longevity, apply a thin layer of clear polish over the decals, then another layer over the entire nail. This sandwiching technique keeps decals from peeling.
Pair with dainty rose gold rings and bracelets for a fully coordinated look.
This design looks salon-quality but takes under 20 minutes at home.
18. Teal Art Deco Star Patterns

Art Deco design and star motifs were made for each other — both geometric, both timeless.
Paint nails in deep teal. This jewel tone screams 1920s glamour.
Using a thin brush and silver or white polish, draw geometric star patterns. Think symmetrical lines radiating from a central point, creating a star shape within a diamond or triangle frame.
Art Deco is all about symmetry, so take your time with these lines. A striping brush makes this much easier.
Budget tool: Striping tape costs about $1 for a roll. Lay it down in geometric patterns, paint over it, and peel for clean lines.
This design transports you straight to a Gatsby-era ballroom. It’s dramatic, sophisticated, and utterly show-stopping.
It works best on medium to long nails where there’s enough space for the geometric details.
On shorter nails, simplify to a single star with two or three radiating lines. Still gorgeous, just scaled down.
Pair with a statement earring, red lipstick, and a sleek updo for full Art Deco impact.
This one’s for nights when you want to be the most interesting person in the room.
19. Blush Pink Star French Tips

A romantic reimagining of the French manicure that’s as sweet as it is stylish.
Apply a sheer blush pink across all nails. One or two coats depending on your desired opacity.
Instead of a traditional white tip line, create the tip effect using tiny white stars clustered along the free edge of each nail.
Pack the stars closer together at the very tip and space them out as you move toward the center. This creates a natural fade effect with stars.
No-cost trick: Use the corner of a cut-up sponge dipped in white polish to stamp small irregular star-like shapes along the tip. It’s fast and surprisingly effective.
This is bridal manicure material. It’s soft, romantic, and photographs like a dream.
Even outside weddings, this works for anyone who loves a feminine, vintage aesthetic without bold colors.
The blush base is forgiving — it hides minor imperfections and looks good as it grows out.
Add a dot of clear glitter polish to the center of a few stars for the tiniest hint of sparkle.
Elegant, simple, and absolutely timeless.
20. Burnt Orange With Copper Star Foils
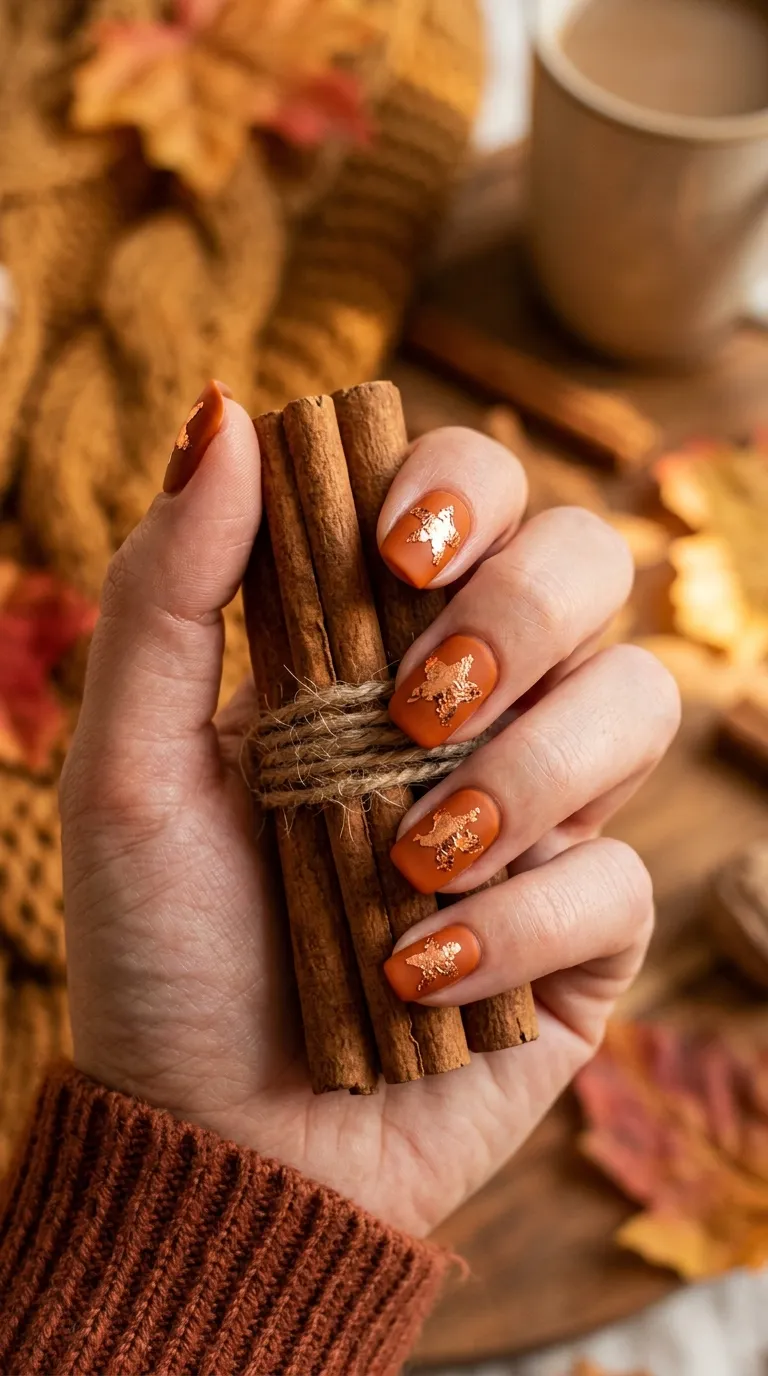
Autumn in a manicure — warm, cozy, and a little bit wild.
Paint nails in saturated burnt orange. Two coats for rich, even color.
While the second coat is still slightly wet, press copper foil pieces onto each nail. Tear the foil into rough star shapes before application. The torn edges add rustic charm.
One or two foil stars per nail keeps it grounded. Too many and it gets busy.
Crafty save: Copper foil sheets from the baking aisle (used for chocolate work) are food-grade and cheaper than cosmetic foil. They work identically on nails.
Seal with a matte top coat to contrast the metallic foil against the flat base. This contrast is what makes the design sing.
Burnt orange is underrated as a nail color. It’s warm, unexpected, and complements gold jewelry perfectly.
This design screams pumpkin patches, hayrides, and hot cider. It’s the seasonal manicure that doesn’t rely on basic fall clichés like leaves or plaid.
Pair with oversized sweaters and brown leather accessories for a fully autumn-coded look.
21. Vintage Denim Blue With White Stars

Think your favorite pair of broken-in jeans, but on your nails.
Choose a slightly muted denim blue — not too bright, not too dark. The faded quality is what sells the vintage angle.
Add small white stars in a repeating pattern across each nail. Keep them evenly spaced, like the pattern on a bandana or vintage fabric.
A dotting tool in two sizes helps create clean star shapes quickly. Dot five points, connect with tiny strokes.
Zero-cost option: Practice the star pattern on a piece of tape stuck to your desk. Peel and apply directly to your nail once you’re happy with it.
This is Americana at its finest. It works for Fourth of July, summer barbecues, or just any day you want to feel effortlessly cool.
The denim-and-white palette is universally flattering and never feels like too much.
Short nails actually suit this design best. The repeating pattern looks proportional and tidy on a smaller surface.
Pair with chambray shirts, white sneakers, and aviator sunglasses. Classic through and through.
22. Mauve Velvet Stars With Matte Finish

Tone-on-tone designs are the quiet luxury of the nail art world, and this one nails it.
Paint your nails in a medium mauve. Let them dry.
Using a slightly darker mauve — mix your base shade with a tiny drop of black — paint stars over the base. The color difference should be subtle, not dramatic.
Finish with a matte top coat over everything. The matte finish unifies the two tones and creates a velvety, textured look.
Mixing tip: You don’t need two separate polishes. Just darken your base shade on a paper plate palette. Saves money and guarantees the colors coordinate.
This design is whisper-quiet but incredibly sophisticated. People notice it up close and appreciate the subtlety.
It’s perfect for professional settings where bold nail art might feel out of place. The stars are there, but they don’t demand attention.
Mauve works across all seasons and pairs with both warm and cool wardrobes.
This is the design for people who want nail art that feels grown-up and refined. Understated vintage at its best.
23. Ivory and Sepia Star Postcards
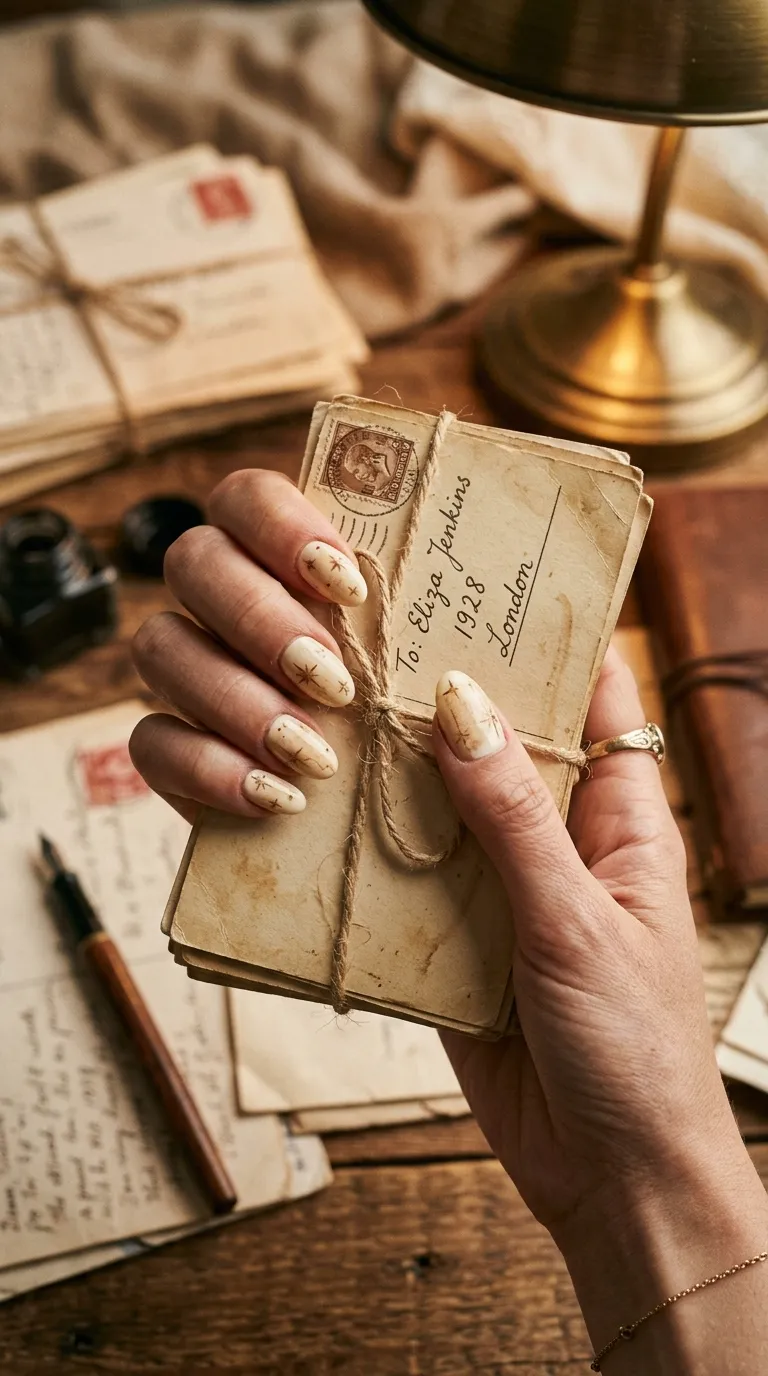
This design looks like a love letter from another era — faded, warm, and full of character.
Paint nails in warm ivory or cream. Avoid pure white — the warmth is what creates the aged look.
Using a thin brush dipped in diluted brown polish (mix with clear top coat to thin it), paint star shapes that look slightly faded and imperfect.
Add thin wash strokes around the stars to create an aged-paper texture. Think tea-stained parchment.
Free technique: Brew a strong cup of tea and dab it onto your painted nails with a cotton ball for a natural aged-paper tint. Seal with top coat.
This design tells a story. It’s not just nail art — it’s wearable nostalgia.
It pairs beautifully with vintage lace, antique jewelry, and sepia-toned fashion photography vibes.
The imperfections are the design. Don’t stress about making the stars perfect. Wobbly edges, uneven wash — it all adds authenticity.
This is a beautiful choice for vintage-themed photo shoots, costume events, or anyone who collects old postcards and love letters.
Quiet, poetic, and utterly unique.
24. Electric Purple With Neon Star Accents

Retro doesn’t always mean muted — the ’80s were loud, and this design honors that energy.
Paint nails in deep electric purple. This shade bridges the gap between vintage and modern.
Add neon pink and neon yellow stars scattered across each nail. Alternate the colors — some nails get pink stars, some get yellow, some get both.
The neon-on-dark contrast is electric. It grabs attention from across the room.
Glow-up hack: Neon nail polishes are often sheer. Apply a white base coat first, then the neon color on top for maximum brightness. The white makes neons pop twice as hard.
This design is perfect for ’80s-themed parties, concerts, dance nights, or any occasion where subtlety isn’t on the menu.
The purple base keeps it from looking juvenile. It’s fun but still wearable for adults.
For an extra touch, use neon polishes that glow under black light. Your nails will literally light up at clubs and events.
Pair with chunky jewelry, big earrings, and bold makeup.
This is the design for people who want their nails to match their personality — bright, bold, and unapologetic.
25. Antique Rose With Faded Gold Stars

Some of the most beautiful things look slightly worn — this manicure embraces that philosophy.
Start with two coats of muted antique rose. This dusty, slightly grayed pink has old-world charm built right in.
Paint gold stars on each nail, then — here’s the trick — gently dab them with a dry brush or tissue before they fully dry. This removes some of the gold and creates a faded, distressed appearance.
The result looks like stars that have been there for decades. Worn, weathered, and romantic.
Almost-free method: Use gold eyeshadow applied with a damp brush instead of gold polish. It naturally creates a softer, more faded look. Seal with top coat.
This design is for romantics. It goes with vintage dresses, antique jewelry, and floral perfumes.
The distressed technique is actually very forgiving. There’s no wrong way to dab — every result looks intentionally aged.
It photographs beautifully in warm light and looks stunning in candlelit settings.
This is one of those designs that people touch your hand to look at more closely. It invites attention without demanding it.
26. Midnight Black Velvet With Diamond Star Studs

Save the best for last — this design is pure midnight glamour.
Paint nails in glossy midnight black. Two coats minimum for a deep, mirror-like finish.
Place crystal rhinestone star studs on each nail. Use nail glue for studs, not just top coat — these are three-dimensional and need proper adhesion.
Position one star stud per nail, centered or slightly off-center. The crystals catch light from every angle and create a subtle sparkle against the dark base.
Steal of a deal: Crystal star rhinestones come in packs of 100+ for under $4 online. One pack lasts for dozens of manicures.
This is your New Year’s Eve, gala, and cocktail party manicure. It’s luxurious, dramatic, and impossible to ignore.
The contrast of sparkling crystals against flat black is stunning. It looks like stars in a clear night sky.
For extra staying power, add a tiny drop of nail glue under each stud and press firmly for 10 seconds.
Pair with an all-black outfit and let the nails be your only accessory. They’re enough.
This design commands a room. It’s the grand finale of this collection, and it earns that spot.
Conclusion
Vintage star nail designs give you a way to wear personality, nostalgia, and creativity right at your fingertips — literally. From soft pastels and muted earth tones to bold rockabilly contrasts and midnight glamour, there’s a star design here for every mood, season, and occasion. The best part about every single design on this list is that you can pull it off at home with basic supplies and a little patience. You don’t need salon-level skills or expensive tools. A steady hand, a thin brush, and a few dollars’ worth of polish can transform your nails into wearable art. So pick your favorite, gather your supplies, and give your nails the retro star treatment they deserve. Your next manicure is waiting — and it’s going to be stellar.